Blackboard LMS Integration Guide
1. LMS configuration
The integration of OctoProctor's proctoring system with Blackboard LMS is carried out using IMS LTI technology.
1.1. SSL-certificate
A valid SSL certificate is required to be installed on the Blackboard LMS web server for the LMS pages to open over HTTPS. You can check the validity of the certificate on the server using SSLChecker.com. This is a requirement of browser security policy, which prevents access to the camera and microphone over an unsecured HTTP protocol. You can issue a free Let's Encrypt SSL certificate.
1.2. Installing the proctoring script
In order for Blackboard LMS proctoring to work properly, a page with the proctoring launch code must be placed on the LMS domain. This is necessary to get around the cross-domain policy that prevents Blackboard LMS pages from opening in IFRAME from another domain.
You can use the standard Blackboard LMS tool to upload content to post a code page. The following steps are required:
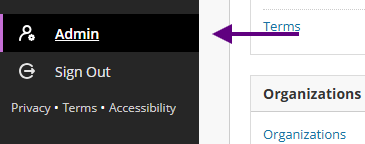
- Login as a Blackboard LMS administrator to "Administrator Panel" (Admin) → "Content Management" → "Manage Content".
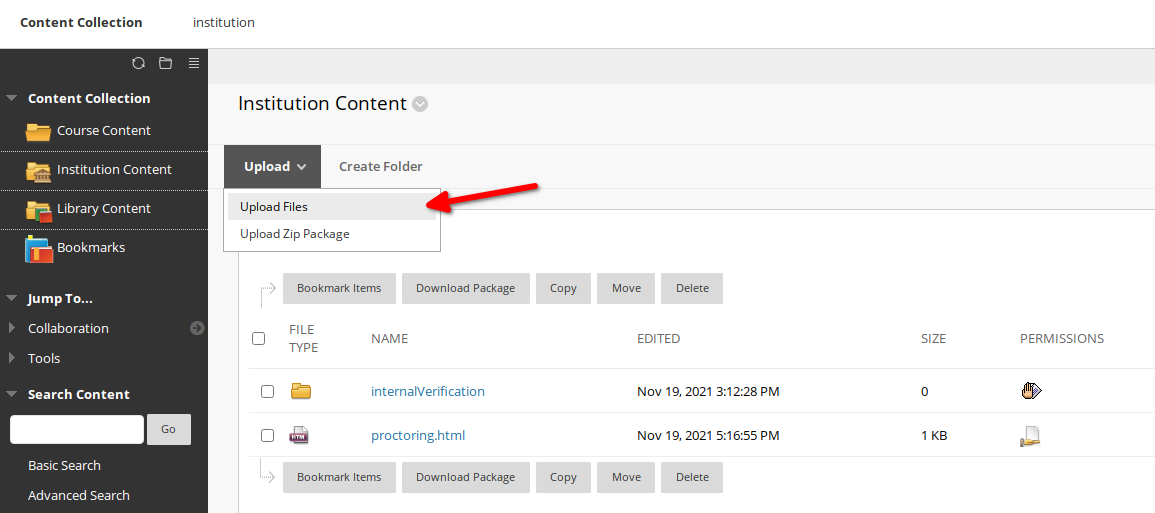
- Select the "Institution" collection to upload the files.
-
Create a "proctoring.html" file on the computer with the following content in Unicode encoding (UTF-8):
<!doctype html>
<html lang="en">
<head>
  <meta charset="utf-8">
  <meta name="viewport" content="width=device-width, initial-scale=1">
  <title>Proctoring</title>
</head>
<body>
  <p>There is nothing here. This is a service page for proctoring.</p>
  <script src="//demo.proctoring.app/sdk/supervisor.js" data-supervisor="sync"></script>
</body>
</html>
NOTE: "demo.proctoring.app" given as an example, it needs to be replaced with the domain of your proctoring server.
-
Load the file "proctoring.html" into the Blackboard LMS:
-
Save the link to the file, right-click on the file and select "Copy link address" from the menu. The link must be of the form:
https://your-lms-domain/bbcswebdav/institution/proctoring.html - All LMS test-takers should have access rights to the file.
1.3. Enabling the LTI tool
Transferring data from the Blackboard LMS to the proctoring system and transferring the trust score from the proctoring system to the LMS is done according to the LTI standard. It needs to be included in the LMS as follows:
- Go as the Blackboard LMS administrator to "Administrator Tools" (Admin) → "Tools and Utilities" → "Tools".
-
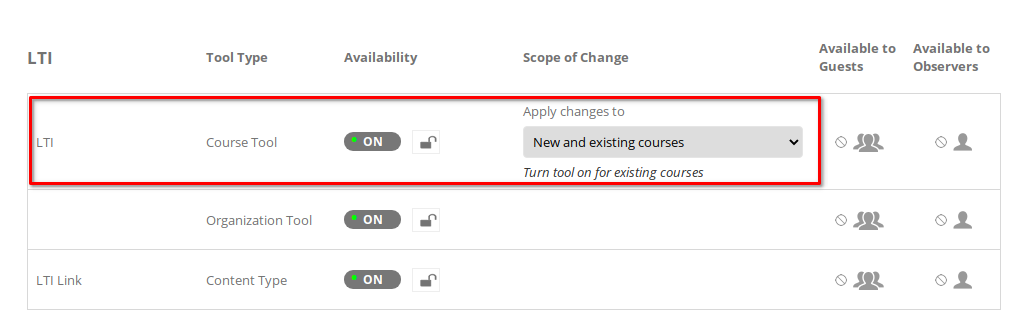
Turn LTI (Course Tool) on, off and on again. The result should be: ON (New and existing courses).
1.4. Adding an LTI provider
Next you need to configure a new LTI provider which will be linked to your proctoring server.
To do this you will need to:
- Login as a Blackboard LMS administrator to "Administrator Tools" (Admin) → "Integrations" → "LTI Tool Providers"
-
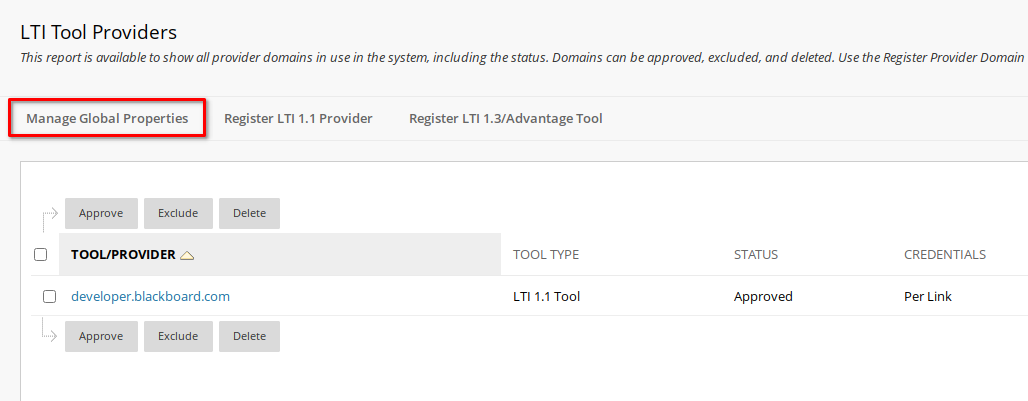
Go to the global settings by pressing the "Manage Global Properties" button:
-
Switch on the following options in the "FEATURE AVAILABILITY" block:
"FEATURE AVAILABILITY" block configuration:
Parameter Value Enabled in Courses Yes Creation of Tool Provider Links Allow only links to approved tool providers Allow configured tool providers to post grades Yes 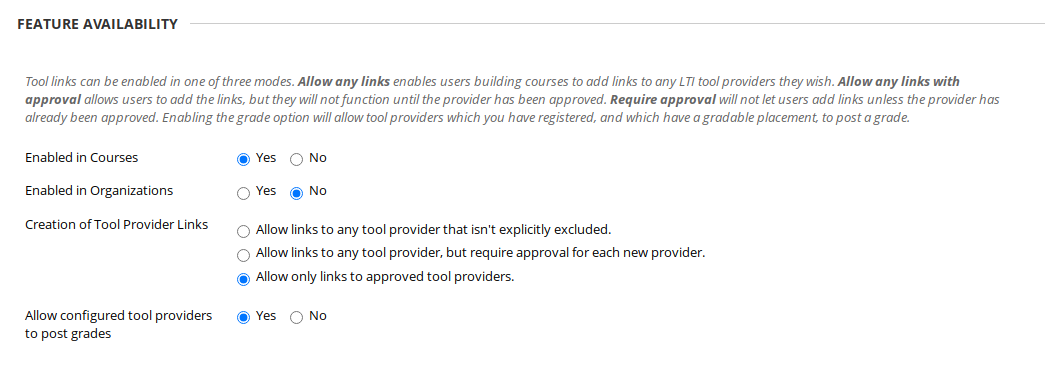
-
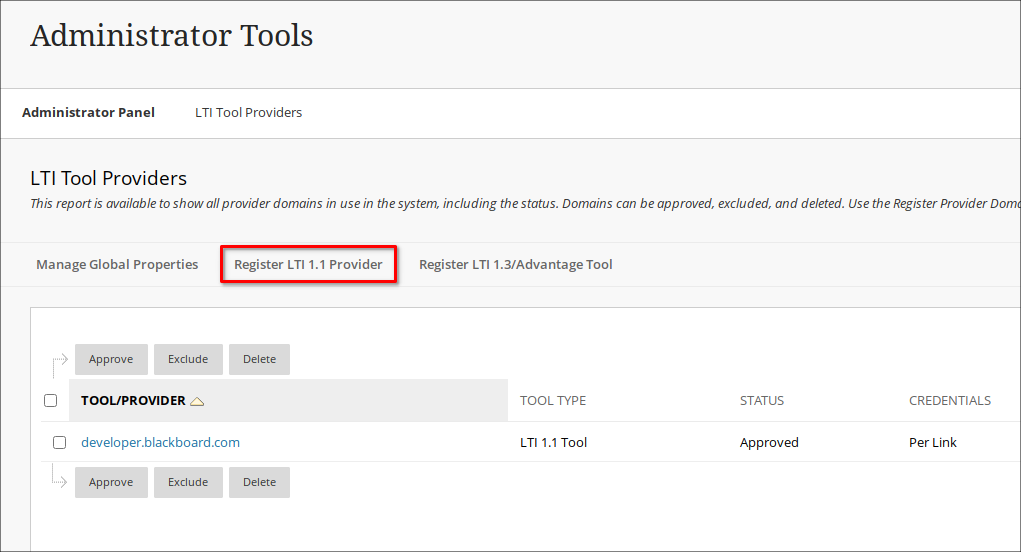
Navigate to the new LTI 1.1 provider registration dialogue using the button "Register LTI 1.1 Provider":
-
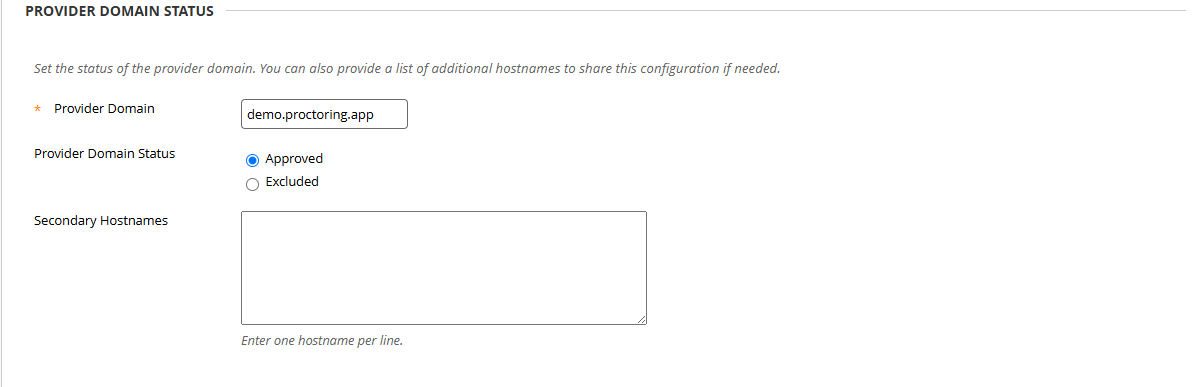
In the "PROVIDER DOMAIN STATUS" section, enter the domain of your proctoring server (Provider Domain):
-
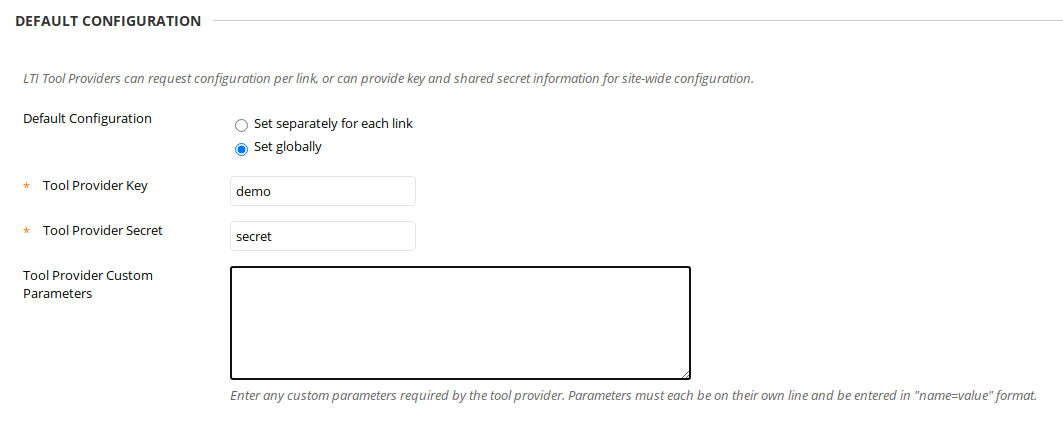
In the "DEFAULT CONFIGURATION" section, fill in the fields "Tool Provider Key" and "Tool Provider Secret", these keys are issued by the proctoring system manager.
-
In the "INSTITUTION POLICIES" section, fill in the fields:
"INSTITUTION POLICIES" settings:
Parameter Value Send User Data Send user data only over SSL User Fields to Send Role in Course
Name
Email Address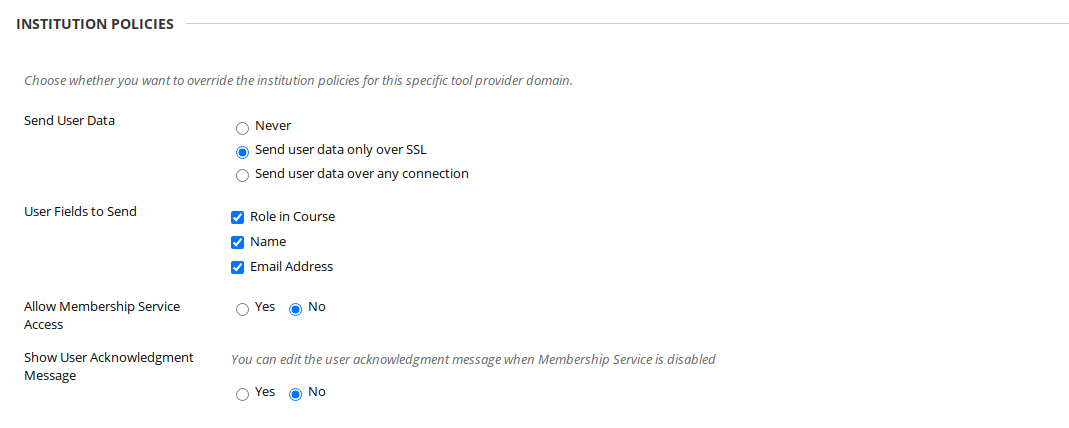
1.5. Adding a placeholder for a tool
In order for course authors to have the opportunity to add a proctoring element to the course, a new placement must be added for the previously created LTI provider.
To do so, follow the steps below:
- Go to "Administrator Tools" (Admin) → "Integrations" → "LTI Tool Providers".
-
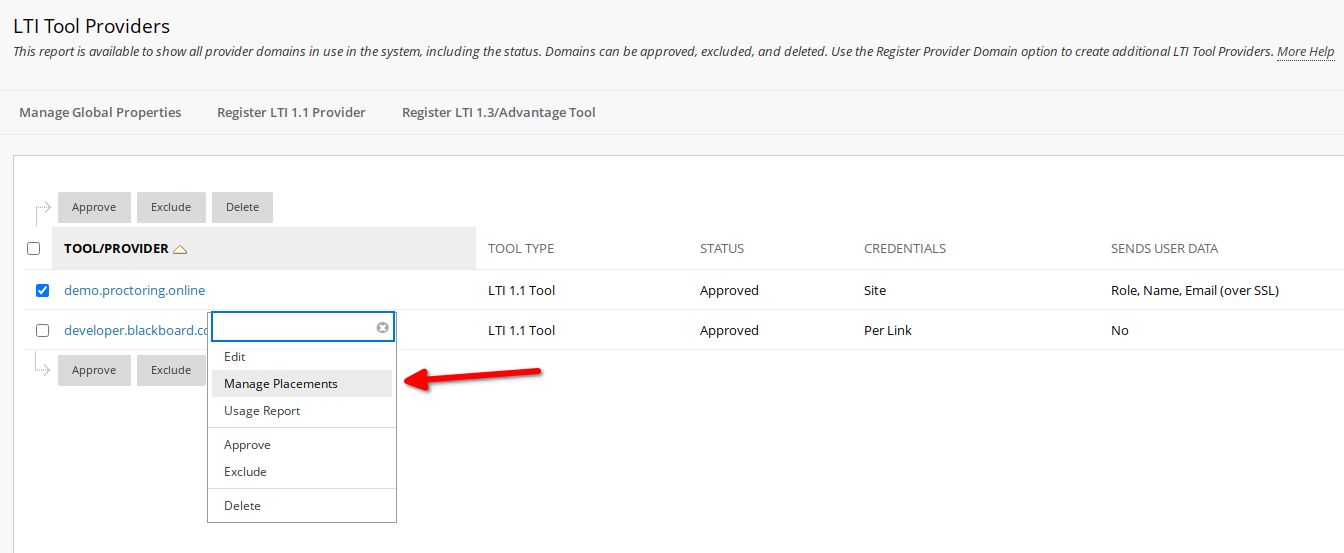
Bring up the drop-down menu next to the name of the previously created LTI provider and select "Manage Placements" from the menu:
-
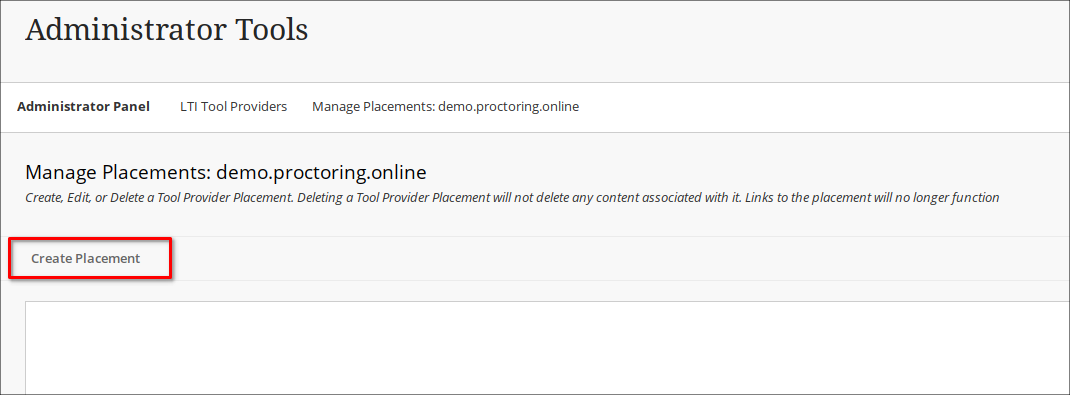
On the page that opens, click on the "Create Placement" button:
-
The following parameters must be specified in the "Add Placement" interface:
Placement configuration:
Parameter Value Label Proctoring Link (or any other title) Handle Any string Availability Yes Type Course content tool + Allows grading Launch in New Window Enabled 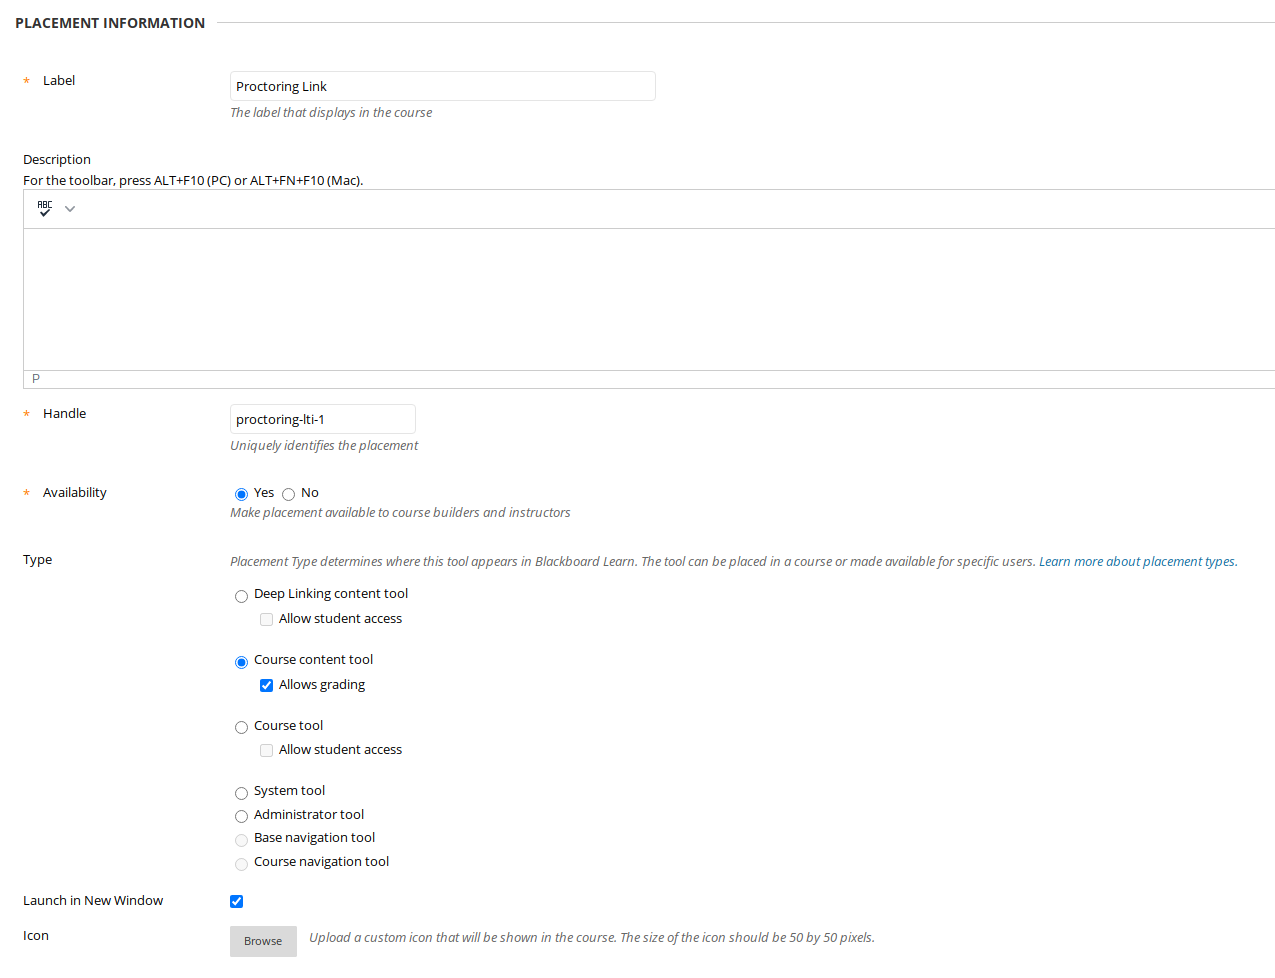
Tool provider configuration:
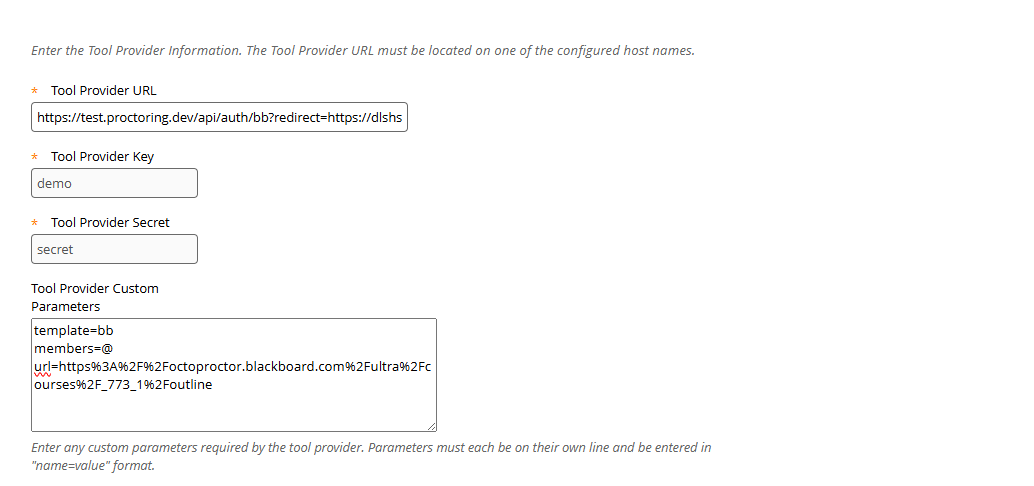
Parameter Value Tool Provider URL https://demo.proctoring.app/api/auth/bb?redirect=https://your-lms-domain/bbcswebdav/institution/proctoring.htmlTool Provider Custom Parameters template= default
members=@
url=<quiz_url>- demo.proctoring.app given as an example, it needs to be replaced with the domain of your proctoring server, and your-lms-domain needs to be replaced by the domain of your Blackboard LMS server (this is the link to the "proctoring.html" file you saved earlier).
- the template parameter specifies the session template identifier in the proctoring system;
- the members parameter specifies the method of proctors distribution;
-
the url parameter contains the link to the course containing the test you want to protect with proctoring. Follow to the course page and copy the URL from the address bar;
NOTE: before pasting the link to the Tool Provider Custom Parameters please encode it using any online service, for example here.
You can create several placements with different user parameters if required.
2. Proctoring integration
2.1. Adding a proctoring link to the course
2.1.1. For Blackboard Original
For participants to be able to use the proctoring, a link to the proctoring element must be added to the course. This can be done as follows:
- Navigate to the "Content" section of the course.
-
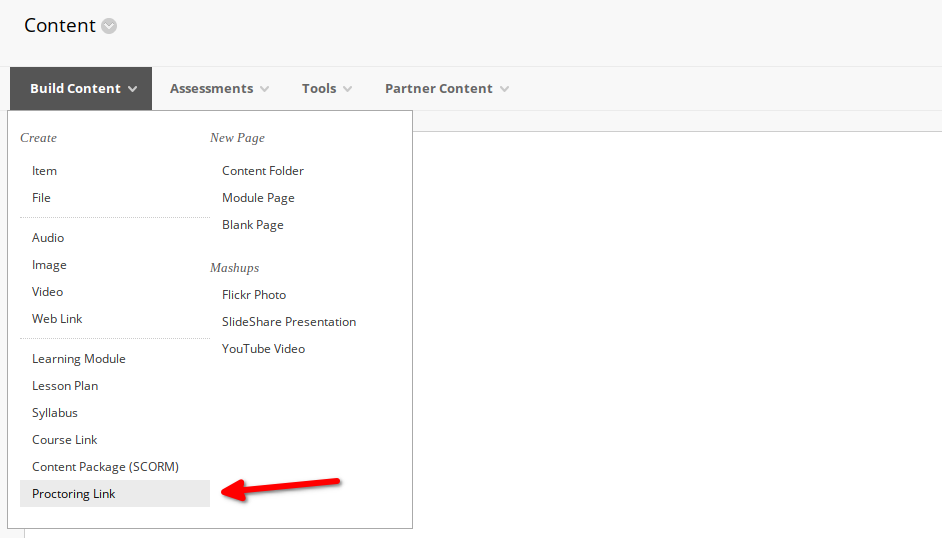
Select a previously created proctoring item from the "Build Content" → "Proctoring Link" list:
-
A link to the proctoring will appear in the course content list:
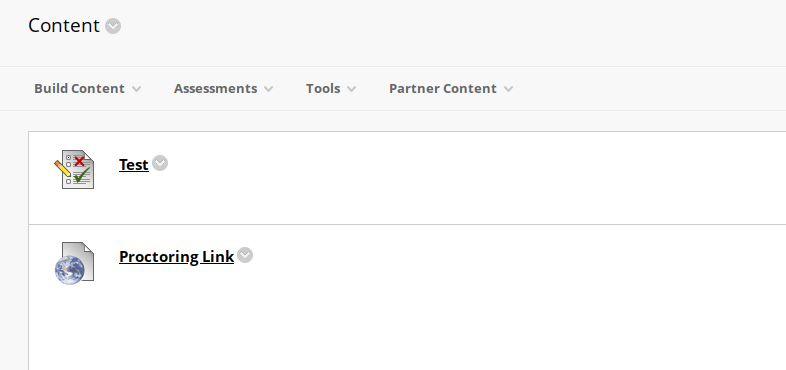
Each link gives the user one proctoring attempt.
Returning proctoring results:
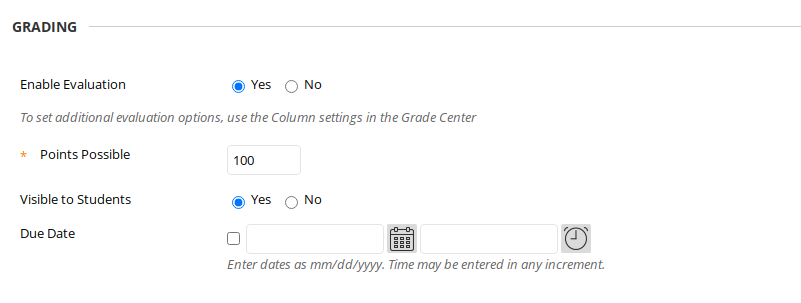
The proctoring system transmits the result of a proctoring session as a grade from 0.001 to 1 (0.1 to 100 on a hundred-point scale). If the conclusion of the session is positive (set by the proctor, or automatically from the credibility score and the threshold of the session), the grade is 1, or the grade of the quiz when the session uses the quiz player (the quiz add-on); otherwise, if the conclusion is negative or there is none, it is the minimum, 0.001. The credibility score itself is not sent. You can enable evaluation of a proctoring item in Blackboard LMS in the following way:
- Navigate to edit the proctoring item (drop-down menu next to the item name).
- Enable the option "GRADING" → "Enable Evaluation".
-
Set the maximum points to 100
2.1.2. For Blackboard Ultra
Click "+" → Content Market → Choose Proctoring Link → Click "+"
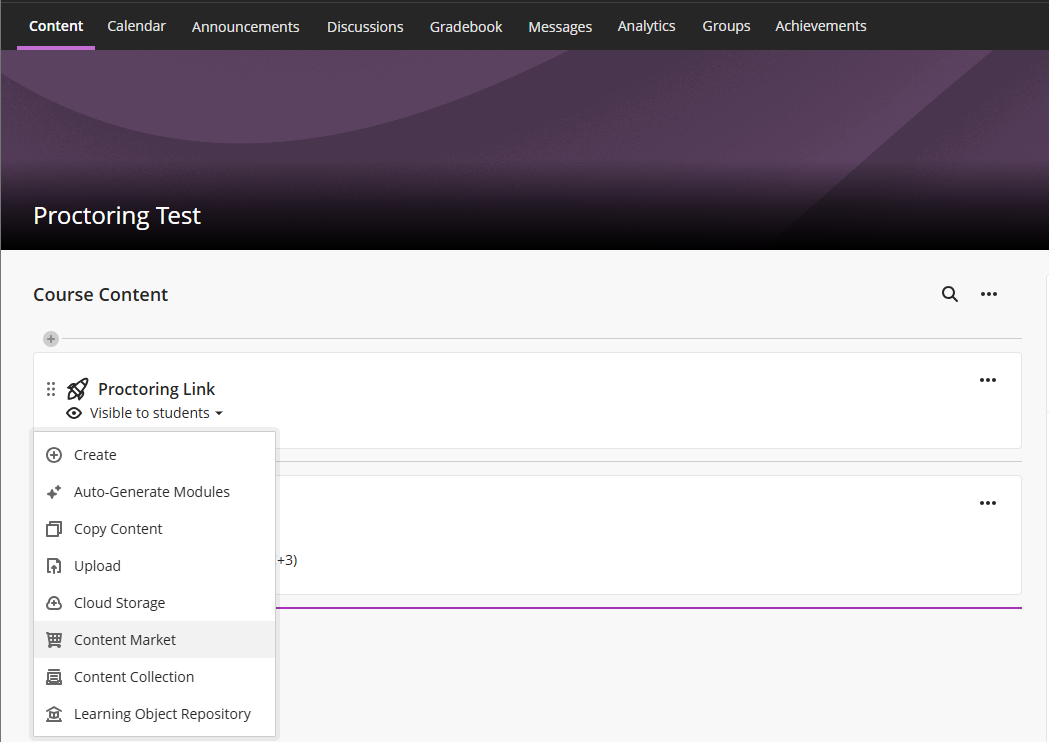
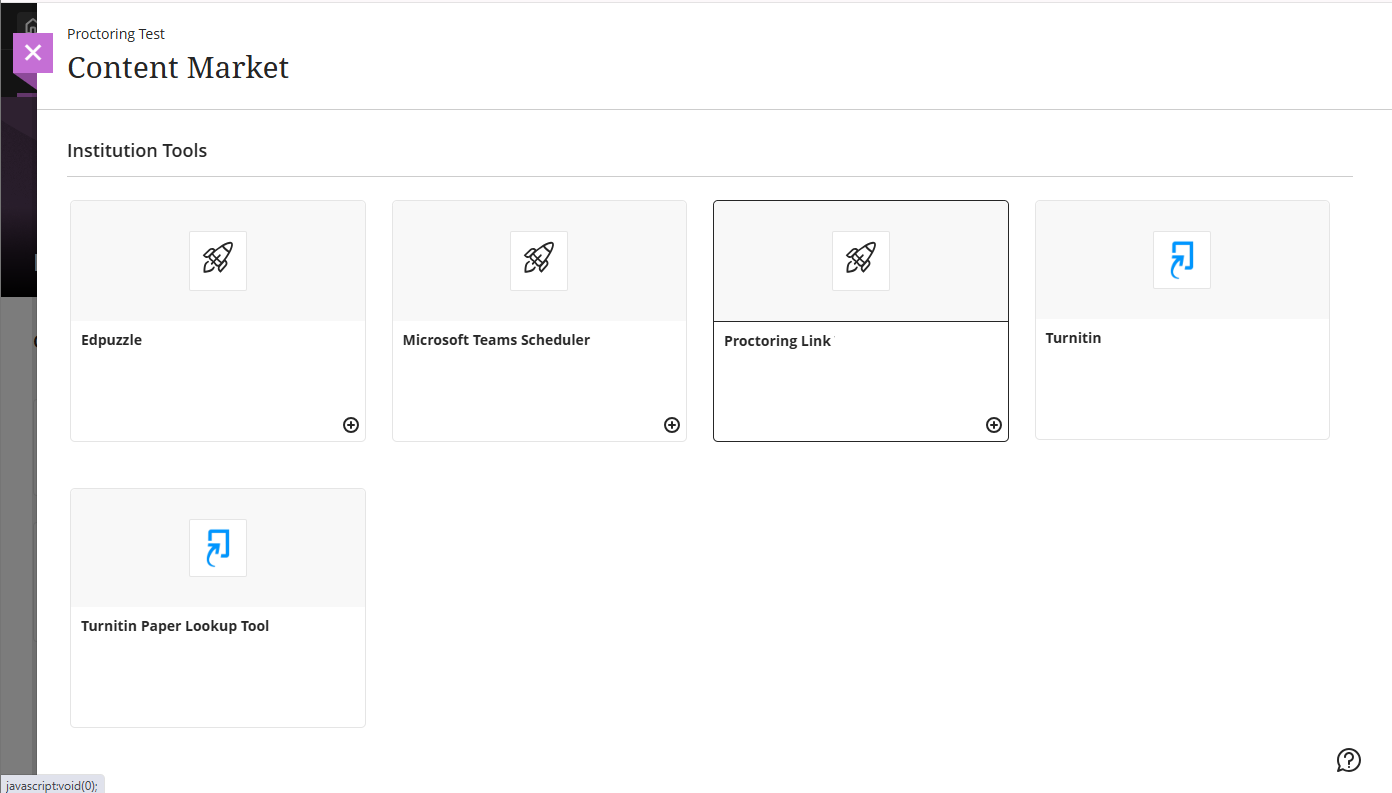
Returning proctoring results:
For this tool to deliver proctoring results back to Blackboard LMS, click the three dots next to the link that appeared in the course → Edit. Enable "Create gradebook entry for this item", and set the grade to maximum 100 Points.
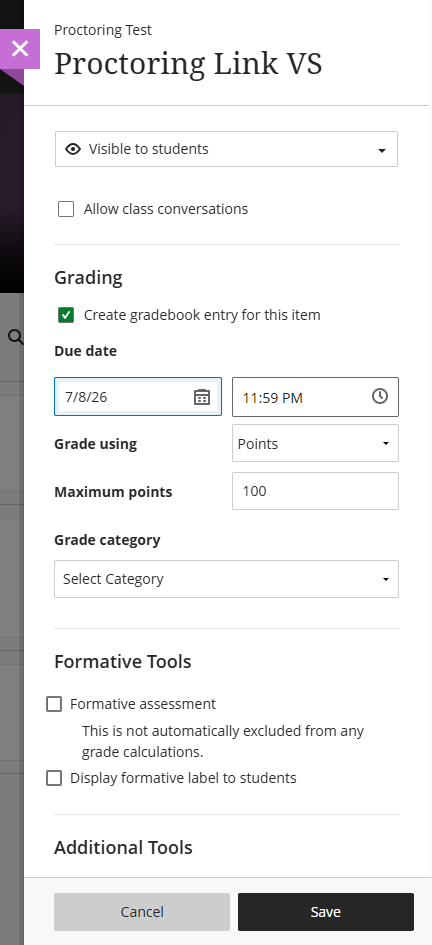
Save the settings
2.2. Restrict access to the assessment without proctoring
2.2.1. For Blackboard Original
Immediately after the beginning of the proctoring session for the proctoring element, the score is set at 0, and after completion, it is always greater than 0 (from 0.1 to 100 with a hundred-point scale). This can be used in the conditions of access restriction of the associated course element "Your course" → "Content" → "Test element properties" → "Adaptive release".
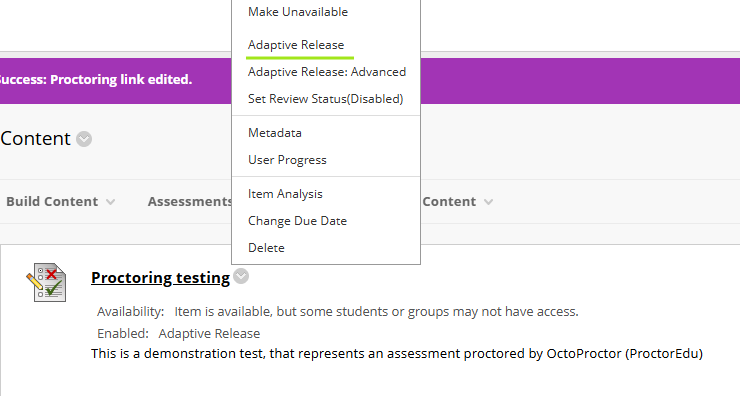
Select the "Grade Center" column → Choose your proctoring link. Then choose "Score" → "Equal to" → 0.00, press "Submit".
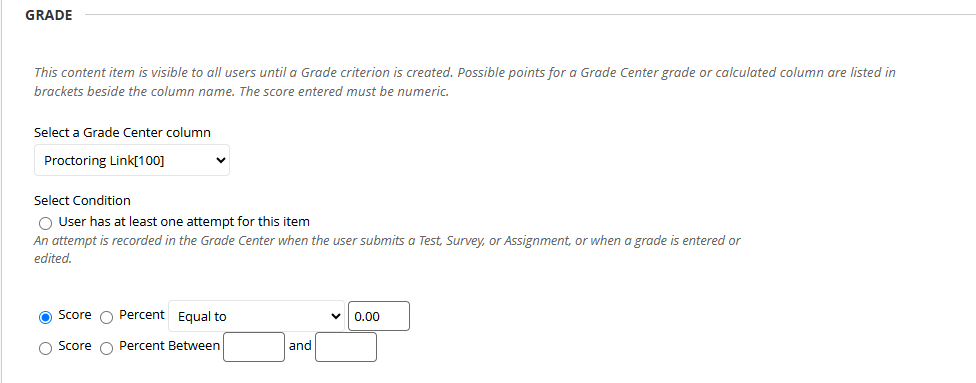
Therefore, the participant will not be able to start the assessment without proctoring.
You should also place the link to the assessment item so that the test-taker can open it directly from the portal home page, as the link to the course is blocked in IFRAME due to the way the Blackboard LMS works.
2.2.2. For Blackboard Ultra
Follow to your "Course" → "Content" → "Test element properties" → "Release conditions"
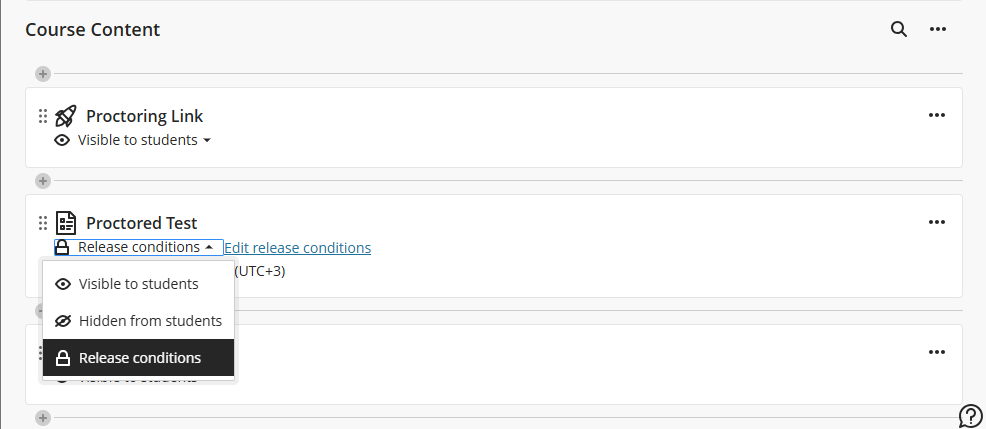
On the left side of the window set the content to be hidden until the conditions are met, otherwise test-takers will be able to see the content, but still won't be able to access it without the proctoring
On the right side check the Activity flag.
- Item → choose your proctoring tool.
- Requirement → choose Custom range.
- Use grading schema → choose Points.
- Minimum points = 0, Maximum points = 0.1
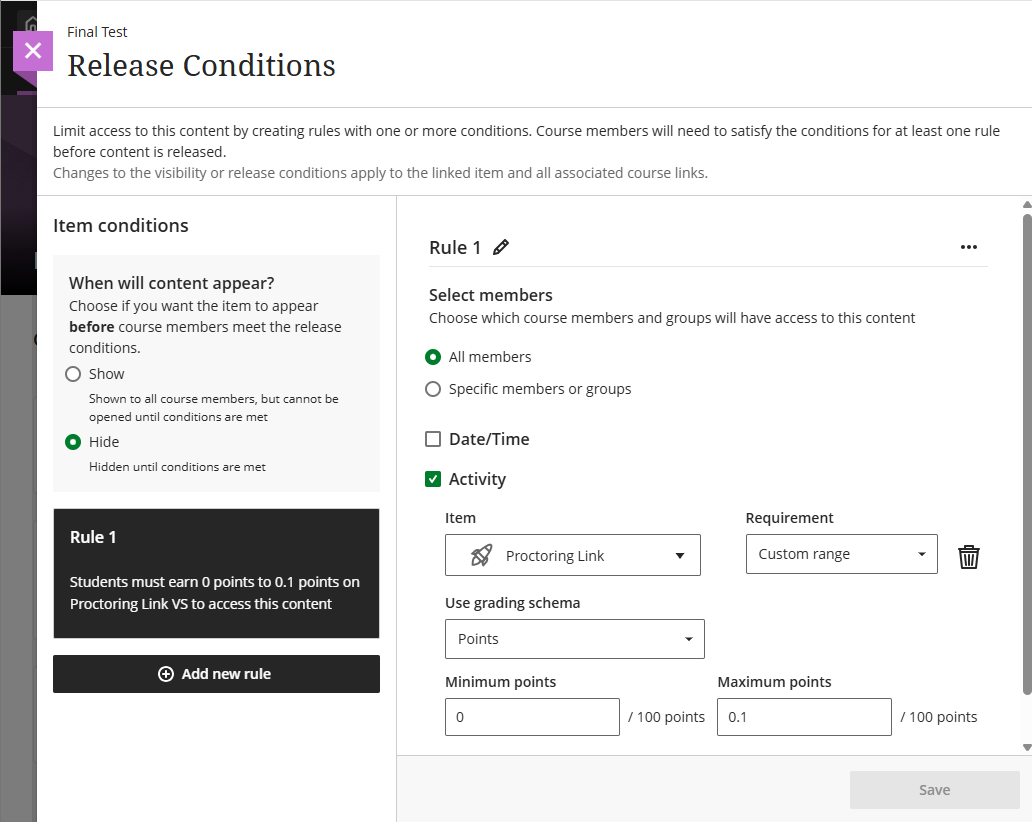
Save the settings
2.3. Use of proctoring
The test-taker will now start executing the linked assessment item on the proctoring procedure when the proctoring item is navigated.
When the proctor clicks the element, they'll be redirected to the proctoring interface as an "Instructor". There, they can access all sessions created by test-takers who clicked the same element.
When the proctoring session is completed, a proctoring grade of 0.001 to 1 will be transmitted to the LMS.
Each proctoring session can only be completed once by a test-taker. It is possible to reset the attempt by changing the session ID through the proctoring system administrator interface, or extend the time by specifying 'Closes at' parameter longer than the current time.
3. Configuring a self deployed proctoring host
To connect the integration API with Blackboard LMS, you need to load the following config with integration parameters under the proctoring system manager:
{
  "id": "<Host_ID>",
  "key": "<License_Key>",
  "params": {
    "webhooks": {
      "bb": {
        "strategy": "lti",
        "consumerKey": "demo",
        "consumerSecret": "secret",
        "callbackURL": "query.redirect",
        "profile": {
          "username": "payload.user_id",
          "role": "payload.roles.find(v => /Instructor/.test(v)) ? 'proctor' : 'student'",
          "nickname": "payload.lis_person_name_full",
          "lang": "(payload.launch_presentation_locale || '').slice(0, 2)",
          "group": "['G', payload.context_id, payload.resource_link_id].join('-')",
          "referrer": "payload.launch_presentation_return_url",
          "labels": "payload.lis_person_contact_email_primary"
        },
        "register": {
          "identifier": "[payload.user_id, payload.context_id, payload.resource_link_id].join('-').replace(/[^A-Za-z0-9_-]+/g, '_')",
          "template": "payload.custom_template || 'default'",
          "subject": "payload.resource_link_title",
          "members": "payload.custom_members === '@' ? user.group : payload.custom_members",
          "url": "payload.custom_url || payload.launch_presentation_return_url",
          "tags": "payload.lis_person_contact_email_primary",
          "code": "payload.custom_code"
        },
        "start": true,
        "stop": true,
        "pause": true,
        "submit": true
      }
    }
  }
}
NOTE: the fields "consumerKey" and "consumerSecret" need to be replaced with a randomly generated sequence of characters (Latin letters of different case and numbers, the recommended length is 24 characters); "id" is the ID of the host (if you do not specify it, a new host will be created); "key" is the license key of this host.