Administrator's Guide
1. System assignment
The proctoring system is designed to confirm the results of online assessments when passing assessments in Learning Management Systems (LMS). OctoProctor Proctoring System allows you to:
- remotely supervise and support the participant throughout the assessment;
- verify the identity of the test-taker;
- identify any possible violations during the assessment and calculation of a credibility score;
- record each session, form complete reports, including sound, webcam and desktop videos;
- resolve possible controversial points after the assessment, based on the session protocol.
2. Technical requirements
There are no special technical requirements for the administrator's PC or laptop. You need just any updated web browser, but Chrome 92+ is recommended.
3. Logging in to the system
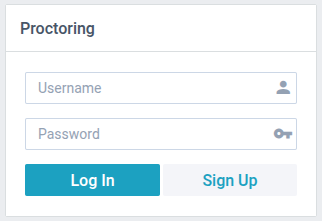
To enter the proctoring system, open its URL in your web browser and type in your login and password. To access the administrator interface, the user must be given the appropriate rights.
When logged in, the top panel of the interface contains language switching, full screen mode, settings and the exit buttons. There is the navigation menu on the left side. And there is a section selected in the menu in the central part. To avoid problems with time display, make sure that the time and time zone on your computer are set correctly.
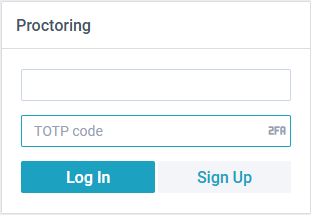
If Two-factor authentication (2FA) is enabled for the profile a user will be required to enter a one-time TOTP code, generated by the authenticator app such as Google Authenticator or Authy.
4. Session management
4.1. Session life cycle
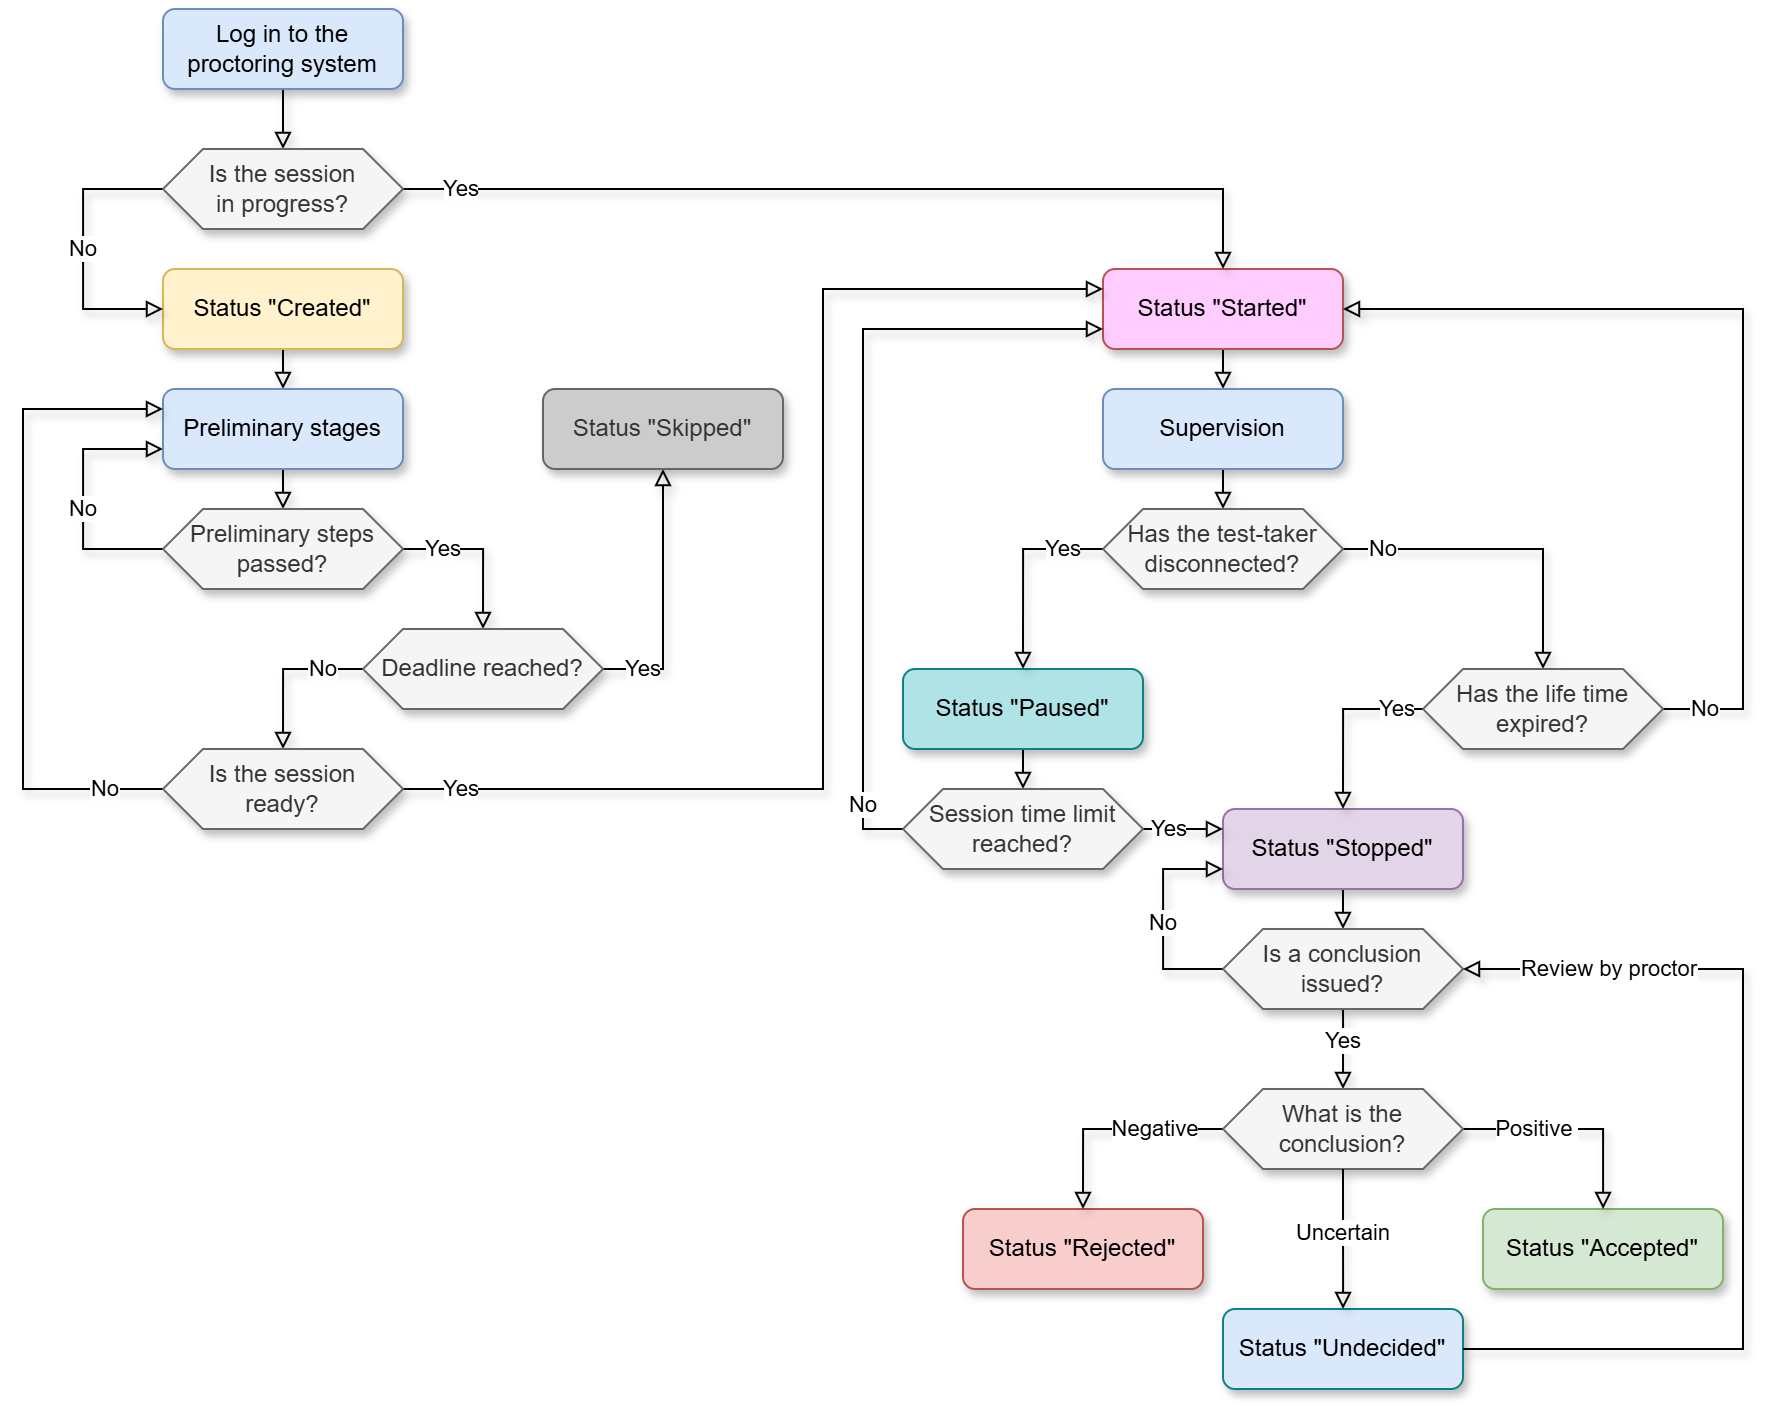
Participants of assessments (test-takers) undergo proctoring sessions in accordance with the life cycle, the diagram of which is shown below. It includes two logically separated blocks: preliminary steps and supervision.
If there is no date and time specified in the "Remove at" field, the session is stored for the duration of the license agreement.
4.2. Search and management
The session schedule table displays a list of all sessions or for a specific period of time. The following functions are available for the administrator:
- full-text search by fields with expression syntax support;
- session management (add, edit, delete);
- export and import of a session list in CSV format (with comma as a separator, UTF-8 encoding);
- viewing sessions and participants information (by clicking on a session name or a participant name);
- observing current sessions (switching to the observation mode of the selected session);
- viewing the session protocol (switching to the protocol of the selected session).
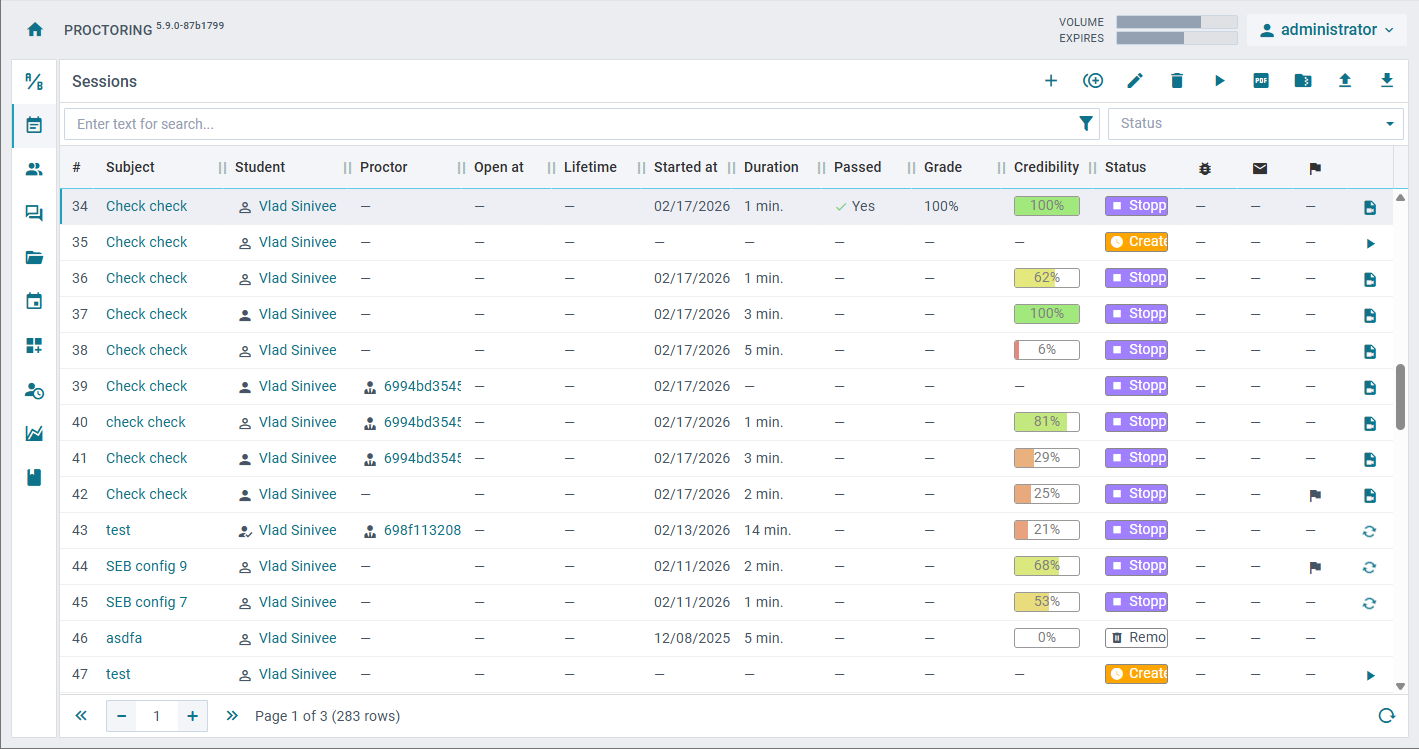
When integrating with the LMS, sessions are created automatically, but the administrator can create a session manually or upload a session list from a CSV file.
To change the parameters of an existing session, select it in the list and press the "Change" button in the toolbar or double-click on the selected session. The session card editing dialog will be opened.
To create a new session manually, click the "Add" button on the toolbar.
To resume a completed session, select it and click the "Restart" button. All previously recorded data will be retained, and the session will simply continue.
NOTE: The restart operation is affected by the Lifetime and Close at fields; the session will only proceed if the current time falls within the allowed limits.
There are several icons representing specific information about a session. The table below includes brief explanation of their meaning:
| Icon | Definition |
|---|---|
 |
Profile is not verified. No photo available for verification |
 |
Profile is verified. The initial photo of the face matches the face in front of the camera during the session |
 |
A mismatch was found in the available images. |
 |
An error occurred on the equipment check stage. Hover over the icon to see details |
 |
An unread message from the test-taker in chat |
 |
An incident flag. Appears if any incidents were triggered. Hover over the icon to see the number of incidents |
You can use the search field to display only the necessary sessions. You can use the syntax of regular expressions in your search. Here are some examples:
- To find a session with the required identifier:
^123$(where 123 is the required identifier, requesting an accurate match); - To find a session with the required identifier:
student1(where student1 is the login of the test-taker); - To find sessions that begin with the word "Entrance":
^entrance(case-insensitive); - To find sessions with the word "exam" in the title:
exam.
The search query can be formulated more precisely using the syntax of regular expressions. Search queries support the operators listed in the Table below. The list of the names of all supported fields can be seen in the data export dialog (via the "Export" button on the toolbar) or in Section 4.3. Date and time formats are in ISO-8601 format (YYYY-MM-DDThh:mm:ss).
Operators for search expressions
| Operator | Description | Example query |
|---|---|---|
now |
You can use the "now" symbol, as well as the "+" or "-" symbols, followed by a number and a unit ("s" for seconds, "m" for minutes, "h" for hours, or "d" for days). The default unit is days. |
createdAt > now-1d & createdAt <= now |
= |
Equal (any) | status = template \| status = [accepted,rejected] |
>= |
Equal or greater than | violations.b1 >= 50 |
<= |
Equal or less than | score <= 50 |
> |
Greater than | createdAt > 2019-12-01 |
() |
Grouping expressions | startedAt > 2019-12-01 & (status = rejected \| score < 50) |
< |
Less than | duration < 5 |
& |
Logical AND | createdAt > 2019-12-01 & duration < 5 |
\| |
Logical OR | status = accepted \| score > 90 |
~* |
Matches a case insensitive regular expression | subject ~* ^exam |
~ |
Matches the regular expression | student.username ~ ^student\d+$ |
!= |
Not equal (any) | conclusion != positive |
== |
Strict equal (all) | members == [proctor1,proctor2] |
!== |
Strict not equal (all) | members !== [] |
" " ' ' |
Text that may include spaces or other operators | subject ~* "some name" |
4.3. Parameters
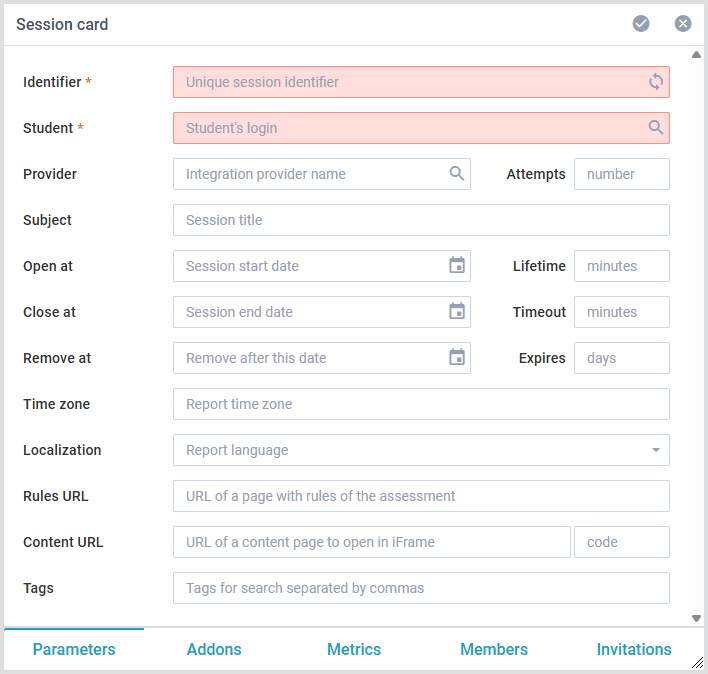
On the "Parameters" tab of the session card, the following fields are available for editing:
- Identifier (
identifier) — A unique identifier of the session, which is formed in the used LMS (allowed characters: A-Za-z0-9_-). - Provider (
provider) — Specifies the name of the integration provider for this session (for example: jwt, lti, plain, etc.). - Attempts (
attempt) — The number of additional attempts to pass the session; i.e., if 2 is specified, then one main attempt and two additional attempts will be given, for a total of three. - Subject (
subject) — Name of the session for displaying in the proctoring system interface. - Student (
student.username) — A user with the "student" role for whom the session has been created aka test-taker - Open at (
openAt) — Date and time until which a test-taker will not be able to start a proctoring session. If not specified, it is not taken into account. - Close at (
closeAt) — Date and time of forced termination of the session. If not specified, it is not taken into account. - Lifetime (
lifetime) — Duration of the session in minutes after its launch; when the specified time is over, the session ends automatically. The force termination time cannot be greater than that specified in the "closeAt" field. If not specified or equal to 0, then it is unlimited. - Timeout (
timeout) — Sets countdown in minutes that activates each time in case of test-taker's disconnection from proctoring session. If the test-taker fails to reconnect, the session is automatically finished after 1 additional minute.- Timeout = 0 or not specified - unlimited
- Timeout = 1 - the session terminates after 2 minutes of disconnection.
- Timeout = 2 - the session terminates after 3 minutes of disconnection, etc.
- Remove at (
removeAt) — Date and time after which the session should be deleted. If not specified, it is not taken into account. - Expires (
expires) — Number of days from the start of the session, after which the session must be deleted (an alternative to the "removeAt" field). - Localization (
locale) — PDF protocol language, for example, "en". - Timezone (
timezone) — PDF protocol time zone, for example, "Europe/Berlin". - Rules URL (
rules) — Page address with the rules of the assessment, which is displayed when the "rules" add-on is enabled. There are the following example web pages:- Video instruction in English: https://files.proctoring.app/video/en/index.html
- Your YouTube video:
https://files.proctoring.app/tools/youtube.html?id=Mvyh5CwNFT4(whereMvyh5CwNFT4is the YouTube video identifier)
- Content URL (
url) — Assessment page address that will be opened in an IFRAME. - Code (
code) — Access code (password) for a quiz in the LMS. This code is automatically injected into the page specified in the IFRAME URL field. - Tags (
tags) — Comma-separated list of keywords that can be searched in the session schedule table.
A participant can go through each proctoring session only once; i.e., if the session has been completed, it cannot be continued. If for some reason you need to continue a completed session, then you can change the "deadline" field, indicating a time later than the current one.
Also, in addition to the session card, there are parameters that are filled in by the system during its operation:
- Template (
template) — Assessment identifier that was used while creating the session. - Duration (
duration) — Actual duration of the session in minutes. - Creation date (
createdAt) — Session creation date and time. - Start (
startedAt) — Session start date and time. - End (
stoppedAt) — Session end date and time. - Signed (
signedAt) — Date and time when the conclusion was made by the proctor. - Status (
status) — Session status:created— Created, but not started yet;started— Started, in progress;paused— Paused, the participant has disconnected (no connection for 2-3 minutes), but they are able to get back within the specified timeout;skipped— Skipped, was not started before the deadline;stopped— Completed, but not rated by the proctor;accepted— Positively rated by the proctor;rejected— Negatively rated by the proctor;undecided— Requires manual review because the session results cannot be evaluated as positive or negative yet. This status can be assigned either manually or automatically;removed— Removed, leaving only the session information.
- Student Verification Flag (
student.verified) — Indicates whether the user's identity was successfully confirmed during this specific session. This ensures that the face photo captured at the start of the assessment matches the profile picture on file. - Student Uniqueness Flag (
student.unique) — Checks if the student's photos match those of other users. The system cross-references their face against all other students' profiles. If any similar records are found, this flag is set to true. - Score (
score) — Credibility score of the session. - Passed (
passed) — This field displays the success of the attempt: ☑ Yes (Passed) if the test taker's score obtained from the SCORM package exceeds the configured "Passing Score," or ☒ No (Failed) otherwise. - Grade (
grade) — Displays the raw test score obtained from the SCORM package during the assessment. - Proctor (
proctor) — Login of the proctor who made the conclusion. - Coverage (
coverage) — The percentage of the actual session duration that was under any proctor's observation. - Incidents (
incidents) — Number of incidents sent by proctors in chat during the session. - Conclusion (
conclusion) — Conclusion of the session credibility:positive— Positive;negative— Negative;uncertain— Uncertain;null— No conclusion.
- Comment (
comment) — Proctor's comment, left when making the conclusion. - IP-address (
ipaddress) — Test-taker's IP address at the moment the session was started. - User-Agent (
useragent) — Contains the browser (application) name and its version, along with information about the computer's operating system. - Error (
error) — Contains the text of the error in case it occurs.
4.4. Addons
NOTE: Only the add-ons included in your license are active and selectable. To unlock additional features, please contact your OctoProctor representative or support@octoproctor.com.
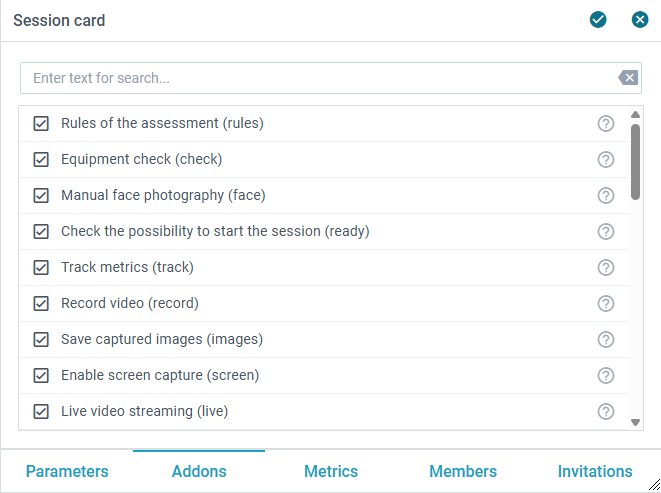
On the "Addons" tab of the session card, the following fields are available for selection:
- Rules of the assessment (
rules) — Displays the assessment rules as the first step and requires participants to agree to them. - Equipment check (
check) — Adds an equipment check step before the session; the list of checks depends on the selected metrics, including checking the browser, network, camera, microphone, and screen. - Filling out the participant's profile (
profile) — Adds a step where participants must manually enter their full name. - Manual face photography (
face) — Requires the test-taker to take a photo of their face. The captured photo is compared with the face photo in the participant's profile. The result of the comparison is either saved in the session card or blocks the transition to the next step in case of a mismatch when theverifyadd-on is enabled. - Manual photography of the passport (
passport) — Requires the test-taker to take a photo of their identity document. The captured photo is compared with the ID photo in the participant's profile. The result of the comparison is either saved in the session card or blocks the transition to the next step in case of a mismatch when theverifyadd-on is enabled. - Upload a scanned copy of the passport (
scan) — Adds an option to upload a scanned copy of an identity document, instead of taking its photo. The uploaded image is compared with the ID photo in the participant's profile. The result of the comparison is either saved in the session card or blocks the transition to the next step in case of a mismatch when theverifyadd-on is enabled. - Add additional passport pages (
extrapages) — Allows test-takers to photograph or upload additional pages of their identity document or any other document. If you want to upload a document photo without any checks, you can enable theextrapages+scanadd-ons and disable thepassport.
By "checks" during this step, the system is verifying that the provided image qualifies as an ID (i.e., it contains a face photo and text):
| Combination of add-ons | Result |
|---|---|
| passport | photo with checks |
| extrapages | photo without checks |
| extrapages + passport | photo with checks + photo without checks |
| scan | file with checks |
| scan + passport | photo or file with checks |
| scan + extrapages | photo or file without checks |
| scan + extrapages + passport | photo or file with checks + photo or file without checks |
- Require identity verification (
verify) — In case verification fails (by face or document at the "face" or "passport" / "upload" stages), do not proceed to the next step until the problem is resolved. - Verify the name in the passport (
name) — Verifies the name entered by the test-taker against the name in the scanned/photographed document. If verification fails, the test-taker cannot proceed. This feature only supports the English language. - Mobile camera connection via QR code (
qrcode) — Includes the step of connecting an additional smartphone camera using a QR code. - Check the possibility to start the session (
ready) — Displays a confirmation dialog before the session begins to ensure the test-taker is ready to start. The add-on is recommended to use for each assessment. - Live video streaming (
live) — Enables real-time observation of test-takers during the assessment and provides the proctor with all standard monitoring features. Also adds WebRTC functionality test at the "equipment check" stage. If disabled, proctors will be unable to view live video streams, use video or audio communication -
Functionality restriction for proctors (
limited) — When the add-on is enabled, the proctor loses the following capabilities:During Live Monitoring During Post-Review Use the microphone, camera and screensharing to communicate with the student Download the PDF protocol Finish and evaluate the session Download the ZIP archive Send free-form messages in the chat. Only predefined templates are allowed Evaluate the session -
Time logging for proctors (
timelog) — Enables the logging of proctors' live observation time. When active, tracking data is captured and displayed both within the individual session card and in the dedicated 'Time report' view, available for administrators.
NOTE: requires (
live) add-on enabled
- Participants must schedule the session time (
schedule) — Adds a step where participants must select the date and time of their assessment from available slots provided by the proctors listed in the "Invitations" field. - Track metrics (
track) — Starts tracking indicators in the session. - Record video (
record) — Saves the video recording of the session. If the "images" add-on is disabled, video recordings are saved without taking separate image snapshots. - Save captured images (
images) — Saves captured minute-by-minute images during a session (webcam, screen, mobile camera) - Allow to run on mobile (
mobile) — Permits participants to take the assessment on mobile devices - Record an overview of a room (
overview) — Requires test-takers to record a brief video overview of their room before the session starts. - Enable screen capture (
screen) — Enables screen recording for participants during the session. - Allow starting only from Safe Exam Browser (
seb) — Requires participants to use the Safe Exam Browser to access the assessment. See more here. - Enable content copy protection (
content) — Enables protection against copying assessment content during a session:- Prevents the context menu (right-click) from appearing;
- Prevents text and content selection via mouse or keyboard;
- Prevents printing of the page content;
- Replaces the page with "about:blank" if the DevTools panel is opened;
- Blocks unauthorized keyboard shortcuts (when the page has focus and is not in an iFrame on another domain). Requires (
lock) add-on; - Prevents screenshots by hiding the page content immediately when focus is lost. Requires (
lock) add-on; - Blocks third-party browser extensions from injecting code, disabling external spellcheckers, copy-bypass tools, and unauthorized plugins;
- Hides the window content when switching tabs or windows (losing focus), restoring it upon return. Requires (
lock) add-on; - Blocks native browser features such as spell check, autocomplete, and page translation;
NOTE: Content protection cannot be fully applied to elements displayed within an iFrame.
- Webcam preview and toolbar (
preview) — Displays a circular window with webcam preview of the test-taker along with a toolbar, allowing test-takers to receive violation notifications from the proctoring system and adjust their positioning or behavior. - Allow chat with proctor (
chat) — Allows the test-taker to open a chat with a proctor by clicking on the preview during an active session or on the question mark icon in the top right during the preliminary steps. - Calculator widget (
calculator) — Allows the participant to open the calculator from the toolbar menu. - Whiteboard widget (
whiteboard) — Allows test-takers to open a whiteboard from the toolbar menu to make notes and drawings during the session - Allow uploading files to the chat (
upload) — Allows test-takers to upload files to the chat. - Virtual machine detection (
vm) — Enables virtual machine usage protection. A VM will be identified during the equipment check, preventing the test-taker from starting the exam, and during the proctoring session, triggering metric b1. - Virtual or remote camera detection (
vcam) — Enables protection against the use of virtual or remote cameras during the equipment check and during the session, triggering metric c1 - Screen lock in case of violations (
lock) — Blocks the assessment screen in case a violation lasts for more than 20 seconds. The screen automatically unlocks 10 seconds after the issue is resolved. - Make available on the link (
shared) — Makes the session available by a link without authorization at "/api/report". - Allow participants to finish the session (
finish) — Shows the "Finish" button in the test-taker's interface. - Automatic conclusion based on session scoring (
auto) — Allows the proctoring system to set the final conclusion for the session based on confidence assessment. - Use SCORM player (
scorm) — Enables support for SCORM packages within the assessment. Allows the playback of a SCORM package linked to the "Content URL" field of the session card.
NOTE: standard documents (HTML) or files will not open if this add-on is enabled
4.5. Metrics
NOTE: Only the metrics included in your license are active and selectable. To unlock additional features, please contact your OctoProctor representative or support@octoproctor.com.
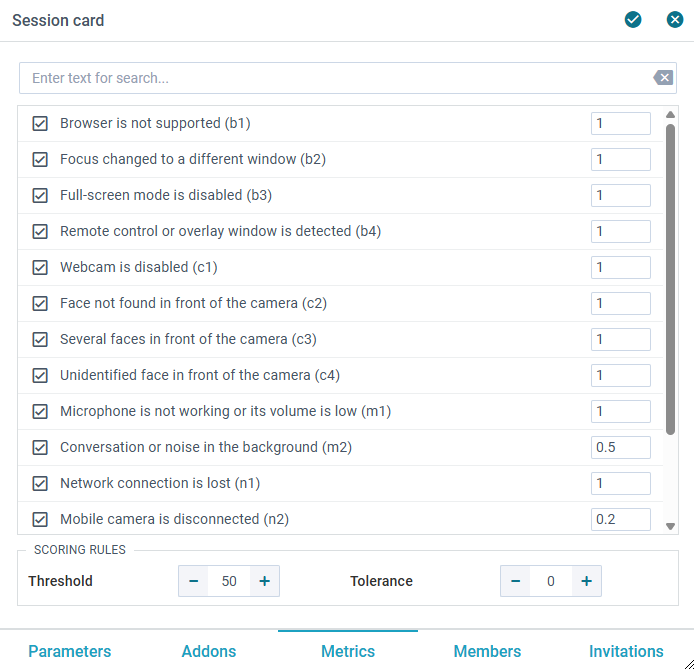
On the "Metrics" tab of the session card, the following metrics are available for selection:
- Browser is not supported (
b1) - Focus changed to a different window (
b2) - Full-screen mode is disabled (
b3) - Remote control or overlay window is detected (
b4) — Not available in iFrame - Unusual key combination is detected (
b5) — Not available in iFrame - Webcam is disabled (
c1) - Face not found in front of the camera (
c2) - Several faces in front of the camera (
c3) - Unidentified face in front of the camera (
c4) - Microphone is not working or its volume is low (
m1) - Conversation or noise in the background (
m2) - Network connection is lost (
n1) - Mobile camera is disconnected (
n2) - Records are not saved (
n3) - Screen activities are not shared (
s1) - Second display is used (
s2)
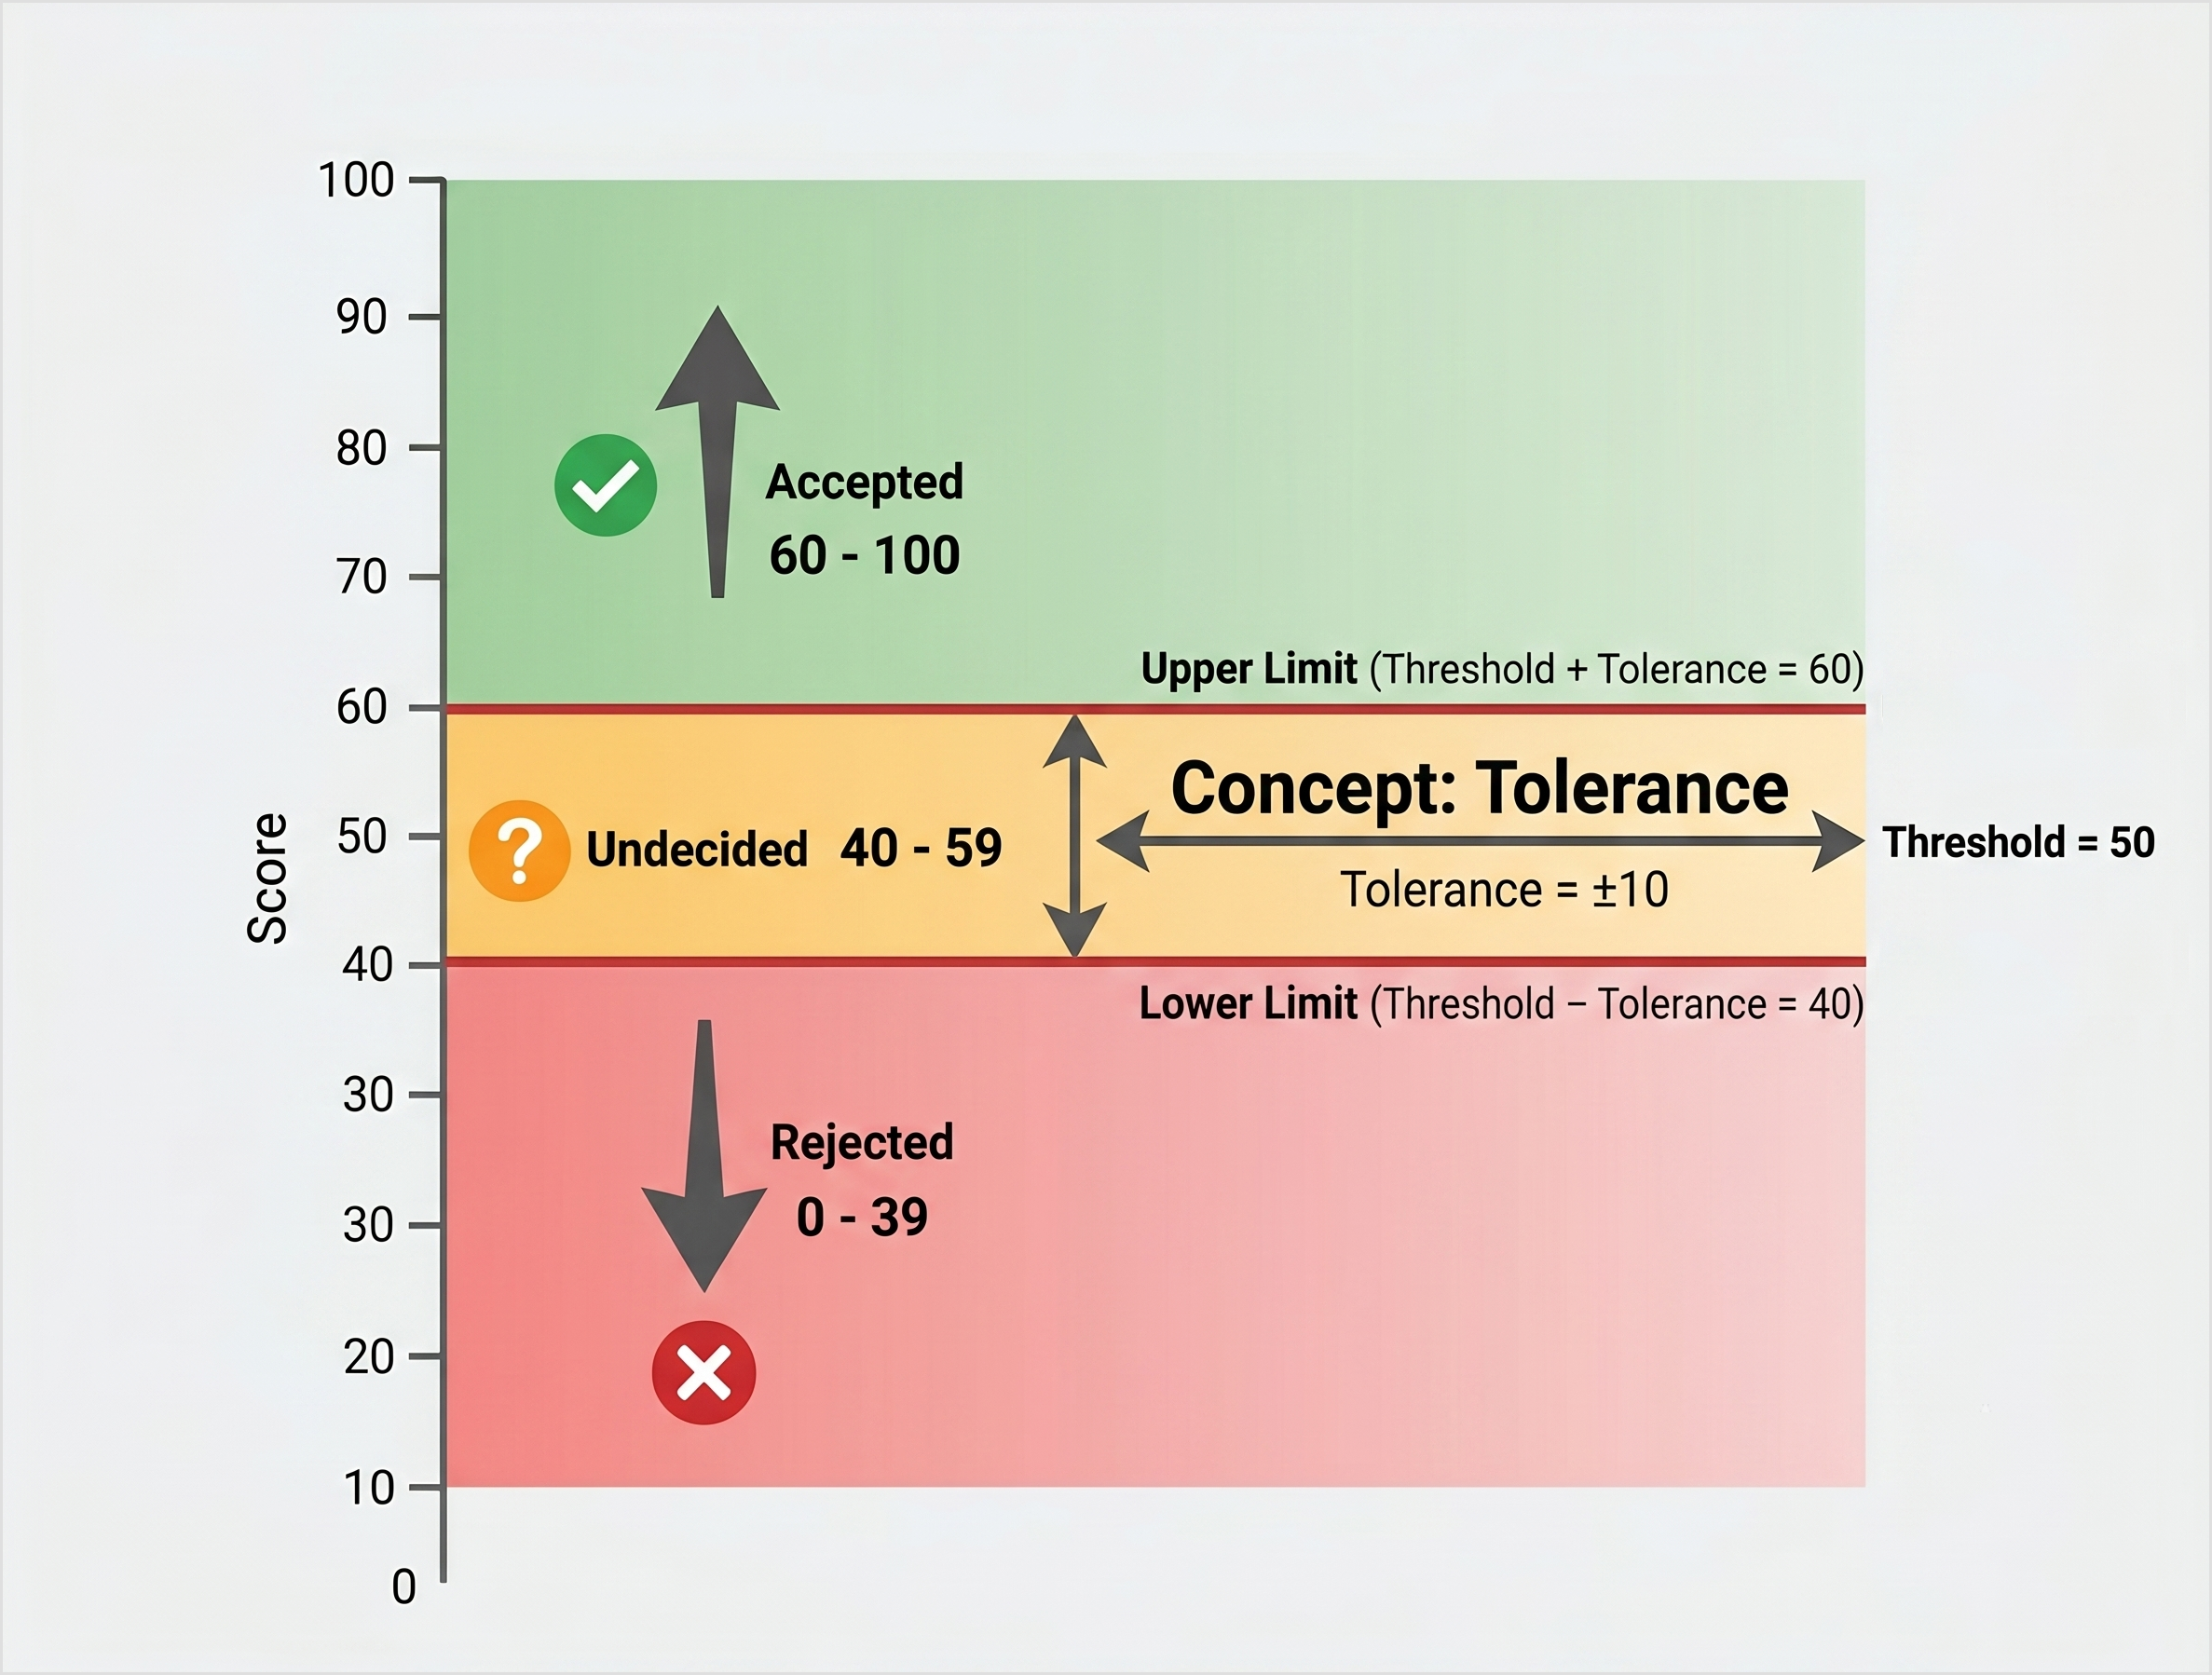
You should also specify the Threshold (threshold) parameter, which is the threshold value used exclusively for the automatic conclusion of a session. If the final score is below the set threshold, the tolerance parameter is not set, and automatic evaluation is enabled, the verdict will be "Rejected"; otherwise, "Accepted".
Each metric has its own weight, which is equal to 0.1 by default. This weight is used to form a confidence rating. The fixed indicators in the session are multiplied by it. The formation of a confidence assessment will be described below.
Tolerance (tolerance) — parameter adds an offset to the threshold for the automatic conclusion. If the session score falls within this offset range it will receive an "undecided" status, meaning it requires manual review by a proctor.
4.6. Members
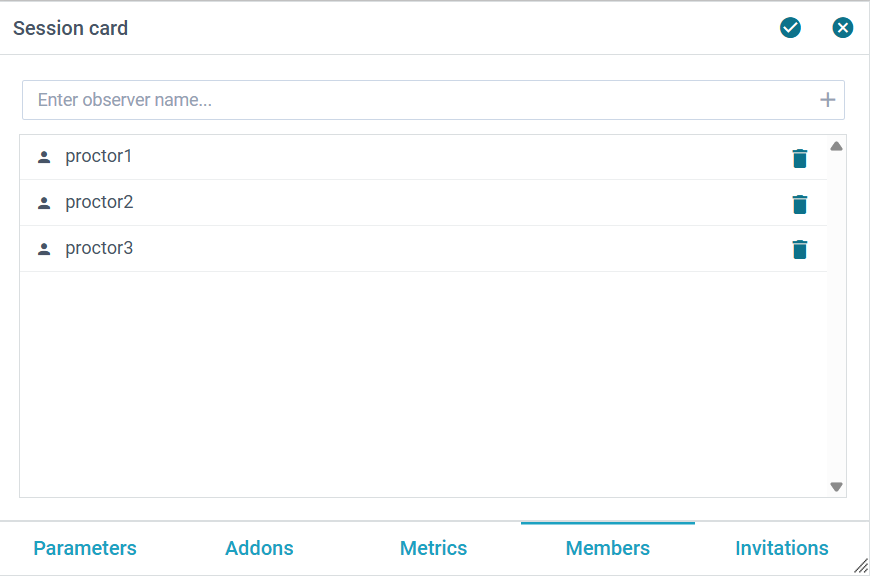
On the "Members" tab of the session card, a list of proctor logins that will have access to this session is indicated. The proctors specified in this list will see all the sessions assigned to them in their interface. You can add either the user's login or his group to the list of observers. User groups are conveniently used to organize access to sessions to a large number of participants without the need for each session to specify this large list. The order in which participants are added is not important. Administrators see all sessions; adding them to the list of participants is not required.
4.7. Invitations
On the "Invites" tab of the session card, a list of proctors to be added to the session participants according to some predefined rules is indicated. Invitations can be used when it is necessary to organize the distribution of proctors by session so that each proctor sees only their own part of the sessions.
As a list of proctors, as well as in the list of observers, their logins are indicated. However, here you can specify the rules for appointing proctors to a session; these rules will be applied to the specified list, and the proctors selected by these rules will be added to the observers in the session. Proctors are distributed equally between the test-taker.
If proctors are assigned by a schedule (the "schedule" add-on is enabled), then the selection of a proctor and their moving to the list of proctors (the "members" field) occurs not at the time the session is started, but at the moment a participant selects the date and time.
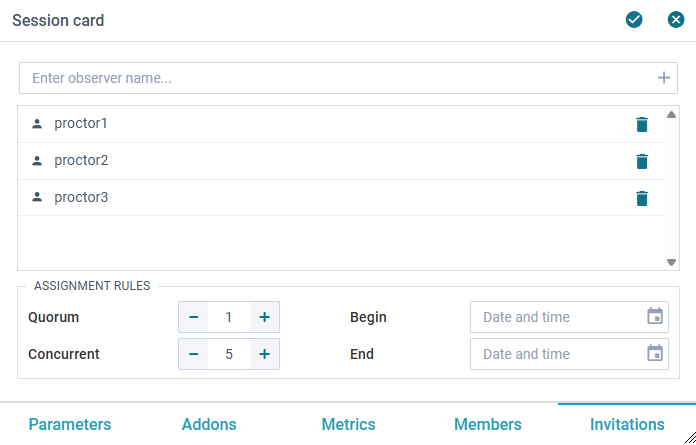
The following assignment rules are supported:
- Quorum (
quorum) — A minimum number of proctors for the session. If the quorum is greater than zero, the specified number of proctors is required to start the session. Prior to version 4.0, this parameter was called "quota". - Concurrent (
concurrent) — A limited number of simultaneous performances per proctor. If "0" is specified, it is unlimited. - Begin (
planAfter) — Limits the planning range of the assessment on the part of the participant; no time slots will be offered before the specified date and time. - End (
planBefore) — Limits the planning range of the assessment on the part of the participant; no time slots will be offered after the specified date and time.
4.8. Similar Faces
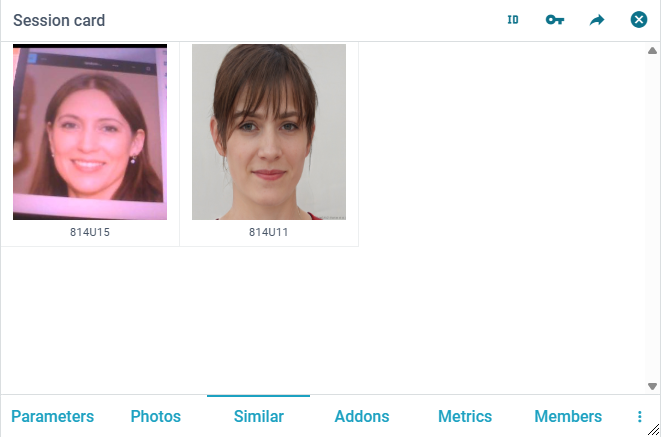
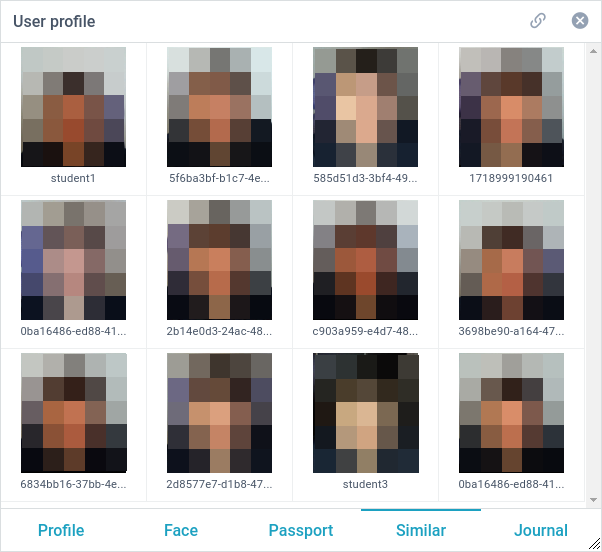
If a similar profile was found based on the user's photo, the similar tab will be available, where you will see a list of similar profiles found. Please note that similar faces in the session card can appear only after a face photo is saved in the current session
4.9. Assessments
Registering the sessions through the external source through the integration it is possible to set up the default parameters. These will be displayed for the units, which were not transferred through the integration. There is a special tab named "Assessments". Each assessment has its own ID, which should be transmitted later when registering sessions through the API in the field "template".
For the sessions created with using Assessments there is a field "template" inside the card of the session. By default, if there was not a particular assessment, the system will use the one with the ID "default" when registering new sessions.
It is convenient to use Assessments for the identification of some default parameters, which could be needed for the different categories of the tests. It is enough to create all the necessary Assessments in advance. From the LMS side it is only needed to give one the Assessments' ID and for the new session the parameters listed in it will apply.
NOTE: The Candidates tab in Assessment. If no test-takers are listed in it, anyone is entitled to enter the session created based on this entity. Otherwise, only users whose usernames are specified in this list will be allowed to take the assessment.
4.10. Interval metric values
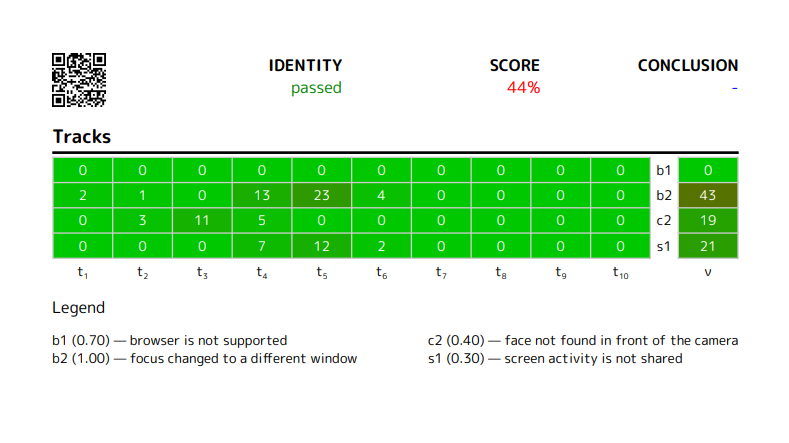
The session card and PDF report include a table of metric values with the session duration divided into 10 equal intervals. The table contains two parts, separated by a column with the name of metrics. The main part displays the raw (unweighted) anomaly values of the violations for each of the 10 time intervals. Severity weights are not applied to the timeline data and are only used in the last column representing the overall weighted penalty for the entire session and in the final credibility score.
Take a look at the table example:

Legend:
- c2, n1, n3, etc. are metrics,
- t1, …, t10 are time intervals,
- v is the violation for the whole session,
- "–" are intervals with no data for specific metrics.
4.11. Credibility score
The credibility of the assessment results is calculated using a weighted, interval-based scoring framework. This approach accurately isolates anomalies and prevents multiple minor violations from unfairly compounding. The final credibility score ranges from 0 to 100.
How the score is calculated:
- Data Collection: First, the values of all triggered metrics are collected every second throughout the assessment.
- Dividing into Intervals: The entire session is divided into exactly 10 equal time intervals.
- Peak Selection: Within each of these 10 intervals, the system isolates only the single strongest violation (the one with the highest weighted score). Other concurrent minor violations in that same interval are ignored.
- Applying Weights: The collected result for each metric is multiplied by its specific severity weight (ranging from 0.0 to 1.0).
- Final Calculation: These peak violation scores from all 10 intervals are summed up. Finally, this total penalty is subtracted from a perfect baseline of 100 to get the final score (if the result is less than 0, the score is simply 0).
Calculation Example
Suppose your session is divided into 10 equal intervals:
- Interval 1: The system detects metric c2 (No face in front of the camera) with a weighted score of 30, and metric b2 (Focus changed) with a weighted score of 10. The peak penalty for this interval is 30 (only the highest is taken).
- Interval 2: The system detects metric m2 (Conversation or noise) with a weighted score of 15.
- Intervals 3 to 10: No violations are detected (penalty is 0).
The total penalty across all intervals is: 30 + 15 = 45. The final Credibility Score is: 100 - 45 = 55%. This method ensures that a severe violation retains its full penalty without being diluted by the overall session length, and prevents background noise from multiple metrics from accumulating into a false penalty.
4.12. Face recognition
The proctoring system uses facial recognition technology to verify the test-taker's identity and ensure they are not replaced by someone else during the assessment.
The facial recognition process is divided into two stages:
- Pre-session Verification: Before starting a session (when the face add-on is enabled), the test-taker takes a baseline photo of their face. This photo is matched against the reference photo saved in their user profile to verify their identity. At this stage, the system also performs a one-time check to find if any similar profiles exist in the database.
- Continuous Session Monitoring: Throughout the active session, the system periodically captures photos of the person sitting in front of the camera. These minute-by-minute photos are continuously compared only to the baseline photo taken right before the session started.
If the system detects a mismatch—meaning a different person is recognized—it triggers the Unidentified face in front of the camera (c4) metric. The photo capturing this violation is automatically saved and placed on the timeline within the session report for further review.
NOTE: The system only compares the passport photo with the facial photo when both of these images appear in the user profile (usercard). The comparison result is stored directly within the usercard.
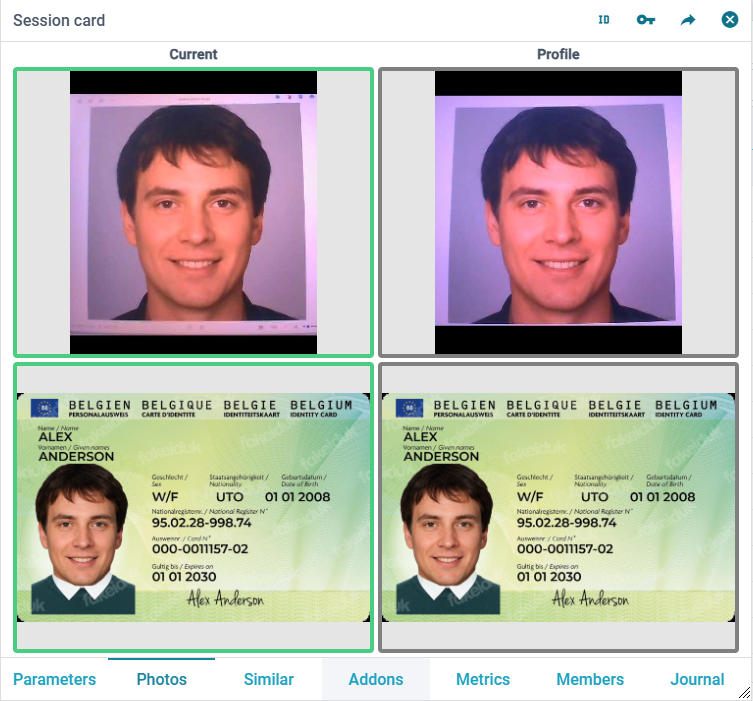
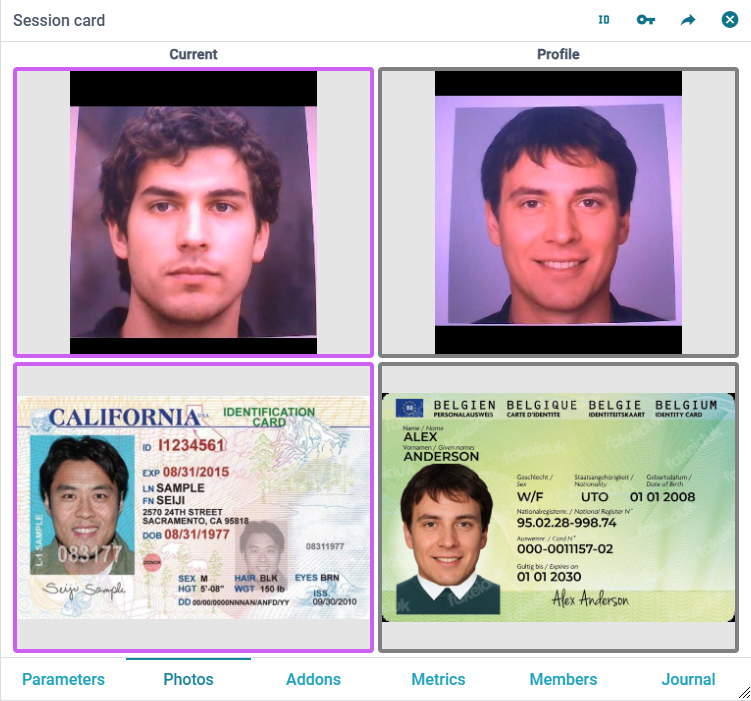
Look at these examples:
Gray outline — Indicates there is nothing to compare the photos against. This is the test-taker's first session, and their face and passport photos are going to be saved to the usercard.
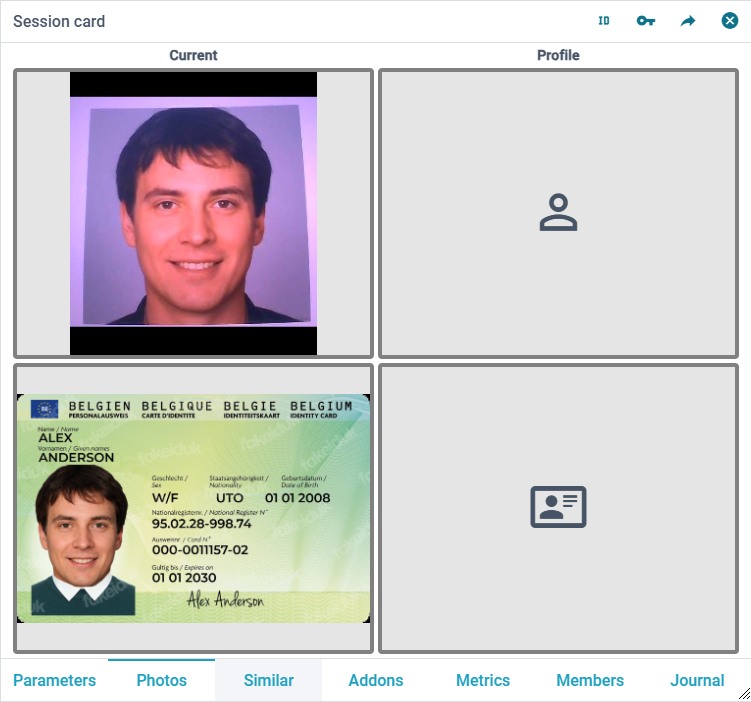
Green outline — Indicates a successful match. The face captured during the session (from the pre-session 'face' verification step) matches the photo in the usercard. The same applies to the user's identity document.
Purple outline — Indicates a mismatch. The face and/or passport photo from the current session does not match the corresponding photo in the profile.
4.13. Online proctoring
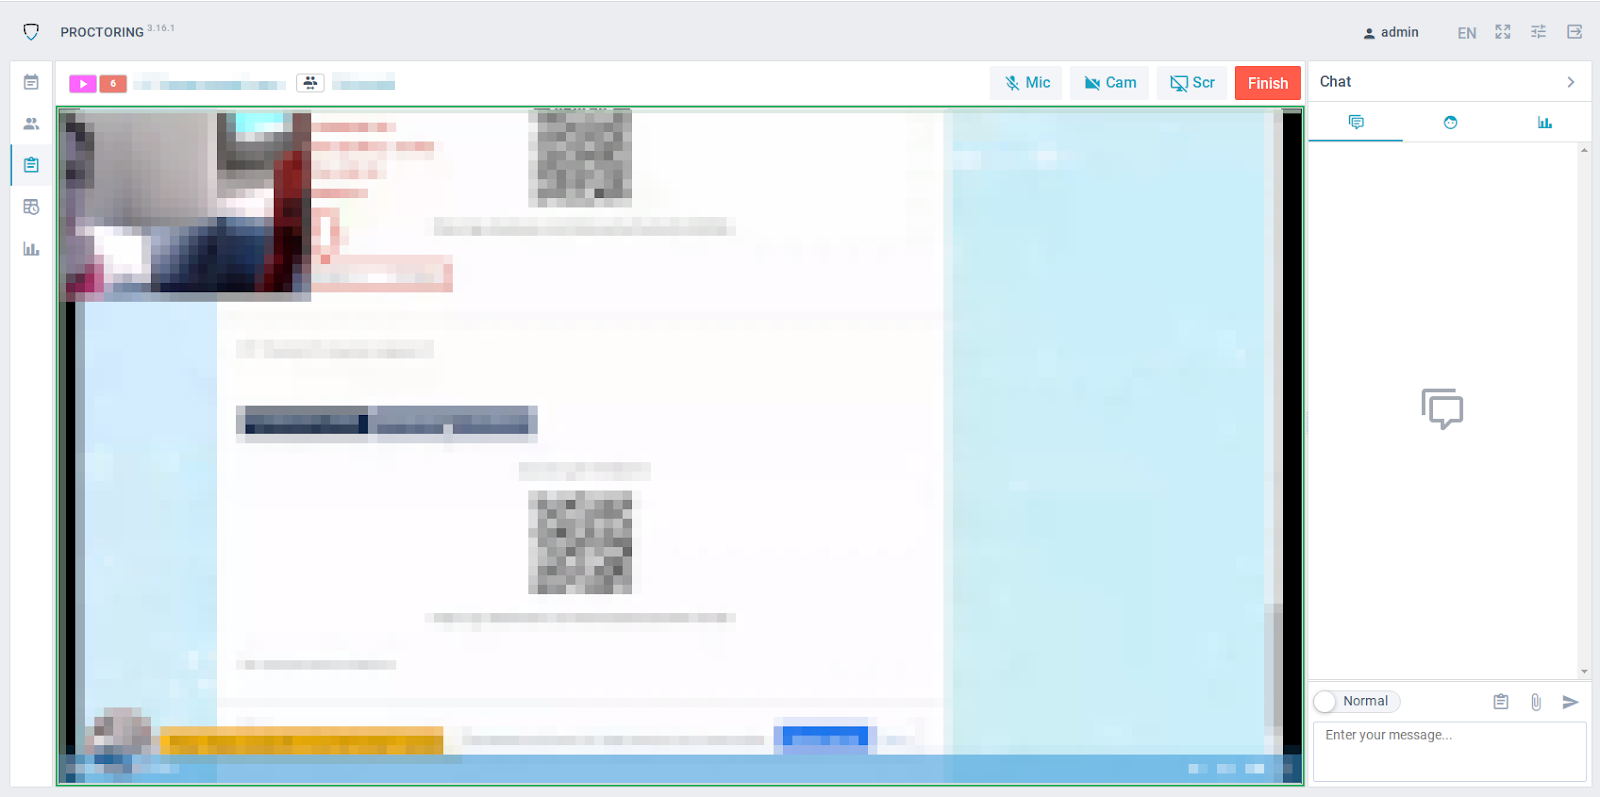
The administrator can observe each session in real time. To do this, on the right side of the line of each ongoing session there is a "Supervision" button. When moving to observing the selected session, the interface opens as shown below. In the central part, the test-taker's video is displayed, in the right part there is a chat, and in the upper part of the video link button with the test-taker and the "Finish" button, which allows you to finish the session.
4.14. Session report
All audio, video, text messages, violations, and attachments are stored in the system and bound to the session protocol. Only proctors and administrators can view the protocols. Proctors can only view the protocols of those sessions in which they were participants.
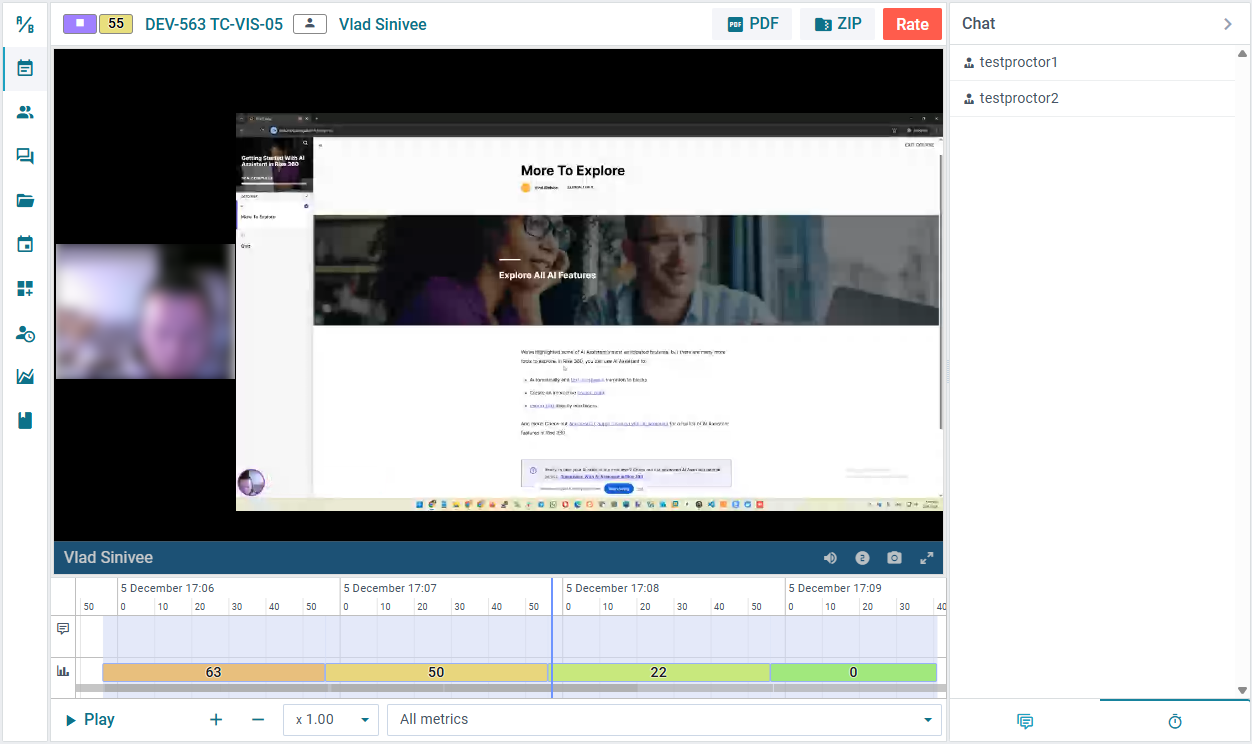
The session protocol includes:
- Detailed information about the session:
- Parameters: name, start and end date and time, duration, deadline, assessment of identity verification, confidence assessment;
- Add-ons included;
- Indicators included;
- List of participants.
- "Rate" button to set or change the conclusion of the session and comment on it;
- "PDF" button to download the protocol;
- Chat messages with photos and attached files (if any);
- The list of proctors who supervised this session and the duration of observation for each of them. This is located in the rightmost tab of the chat.
- Area with video recordings of broadcasts (webcam and test-taker's screen);
- Timeline divided into several sections:
- Total rate of violations per minute (when hovering, it shows a histogram with explicit details of violations);
- Marks of the moment of photographing the face of the test-taker;
- Marks of the moment of sending messages to the chat;
- Playback control (play, pause, on/off sound, timeline scale, playback speed);
- A histogram of average indicators for the entire period of time.
- The gray bar marks the period during which a proctor was observing this session.
At the bottom of the protocol, the session timeline is displayed, which consists of a timeline, the current playback position (vertical moving line), and three horizontal sections. The color coding (from green to red) indicates the severity of violations for each minute. The value ranges from 0 (no violations, green) up to 100 (critical violation, red), representing the raw, unweighted intensity of violations detected in that minute. In the first section, events are displayed: the moment of photographing a person for verification of identity, chat messages, proctor notes. The second section displays the video tracks. The third section displays a pop-up histogram of metrics for each minute.
Moving along the timeline, you can find the violation moments and play back the video recordings of these sections. The histogram of average values of indicators can determine the most frequent and long-term violations.
Throughout the session, data is collected on the metrics listed in Section 4.5. Based on the collected metrics, the credibility score is calculated; the formula is given in Section 4.9. Because data is stored per minute, the credibility is not set for sessions with a continuous duration of less than 1 minute. Identity verification and the "c4" metric appear after the total presence of a face in front of the camera for at least 1 minute, provided that the quality of the photo allows recognition of the face with a biometrics subsystem.
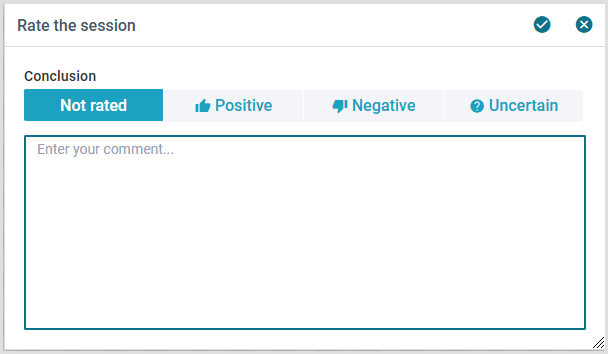
The administrator, along with the proctor, can evaluate the sessions, indicating a positive or negative conclusion and commenting on it.
To call the conclusion dialog for the session, click the "Rate" button in the protocol interface.
4.15. PDF report
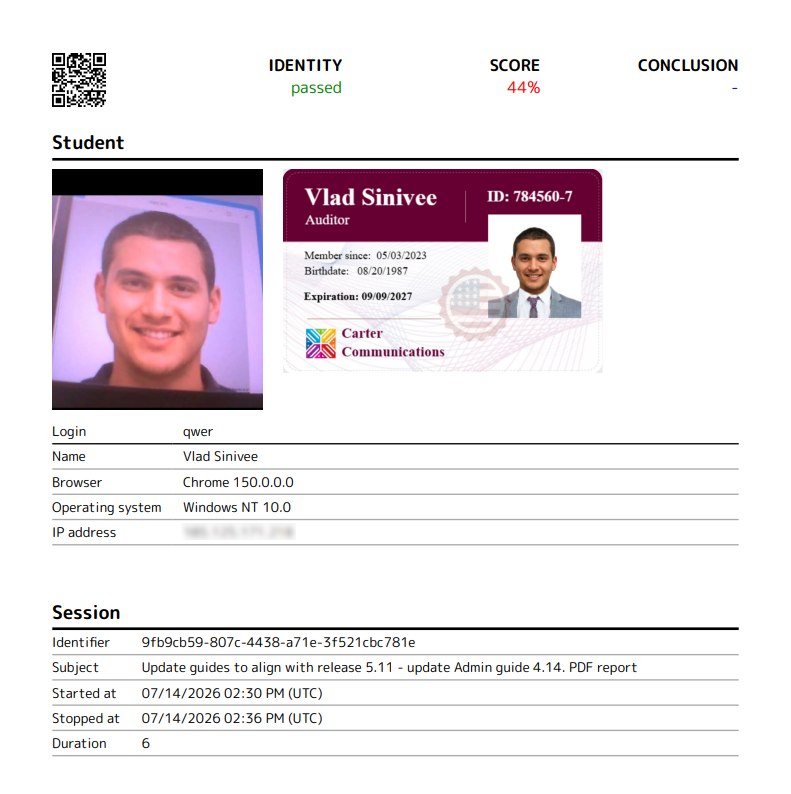
In addition to the main online report, you can get a PDF version of the report, which can be downloaded using the "PDF" button. This is an abridged version, including a test-taker's profile and photo, a session card, a map of the distribution of violations by time, as well as averaged indicators for the session.
Pages 3 and above of this PDF can contain proctor notes with screenshots added via the session report interface.
Images below show an example of such a protocol; the QR code contains a session identifier.
4.16. ZIP archive
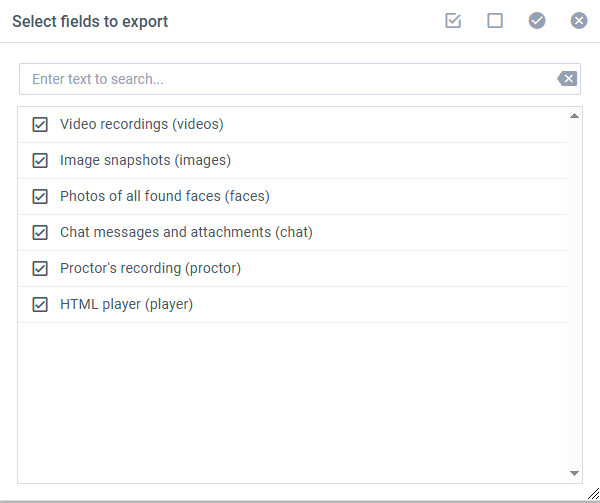
In some cases, there is a need to download all data for a particular session. This can be done with the "Download ZIP" button from the session table interface or from a specific session log. When downloading the archive, you can select which data to include.
The following data can be selected:
- Video recordings (videos)
- Image snapshots (images)
- Photos of all found faces (faces)
- Chat messages and attachments (chat)
- Proctor's recording (proctor)
- HTML player (player)
4.17. Log in as a test-taker
The administrator can log in as a different user with the "student" role and the specified session. To do this, use the button in the session card.
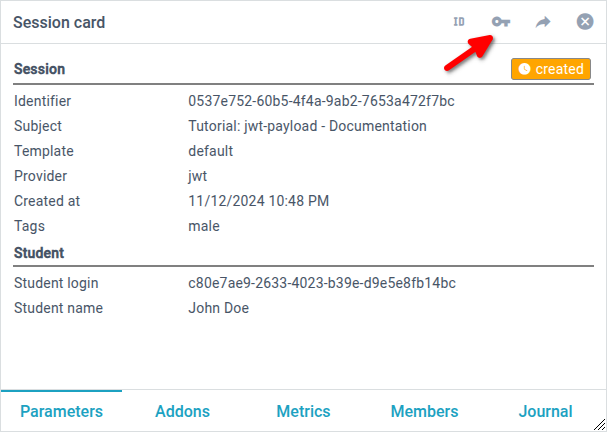
4.18. Link to report without authorization
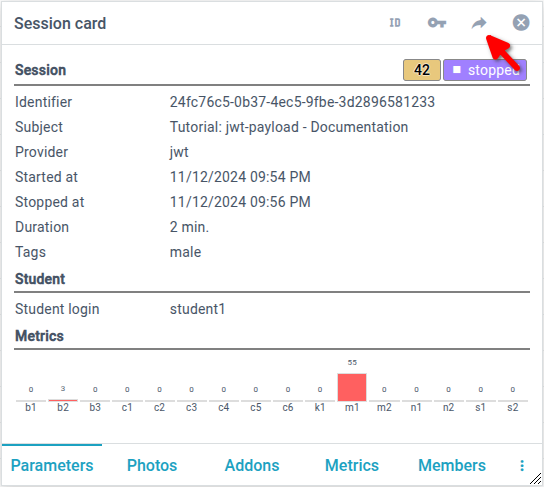
You can create special links to access a specific session protocol. By these links, you can open the session protocol without logging in. To allow opening sessions using a link without authorization, you need to enable the "Make available by link (shared)" add-on for a specific session or in the Assessment. In this case, it is recommended to use complex random session IDs, which are protected from brute-force attacks. The link to the protocol is formed as follows:
https://demo.proctoring.app/api/report/<identifier>
where demo.proctoring.app is the address of the proctoring system server, and <identifier> is the session identifier.
You can get the link from a session card with the button in the header.
5. User management
5.1. Search and management
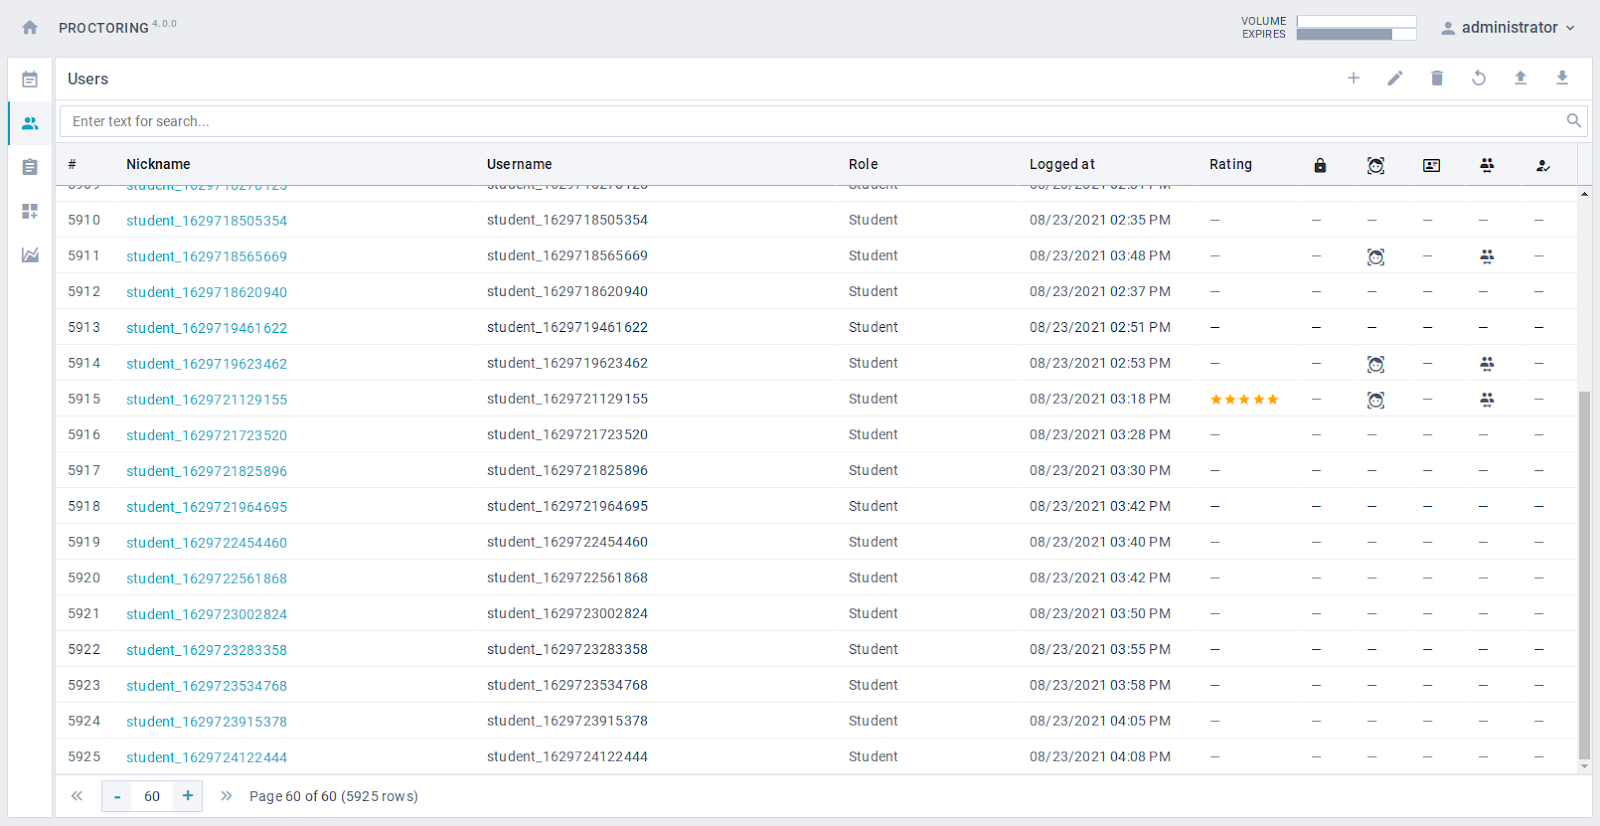
A list of all users of the system is available to the administrator. Users are either added automatically when configuring a connection with an external authorization provider, or are imported from a CSV file, or are added manually by the administrator. The following functions are available to the administrator:
- user profile creation;
- editing user profile;
- delete user profile;
- import and export users from a CSV file;
- full-text search in table fields.
5.2. User profile
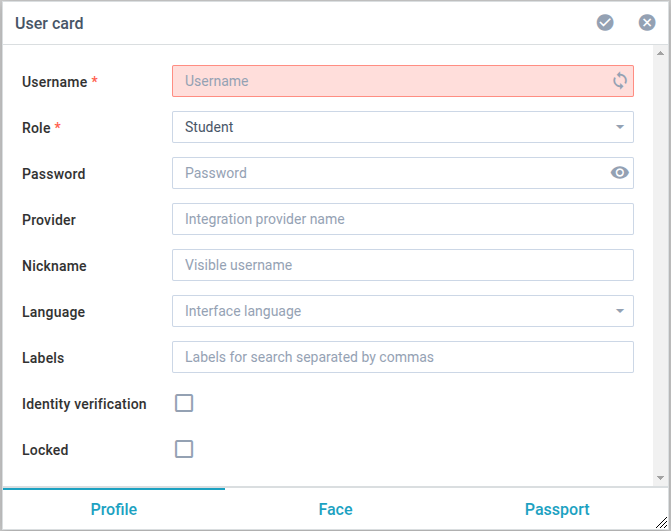
When adding or changing a user account, it is required to fill in the required fields, which are marked with red asterisks.
- Username (
username) — A unique user ID that is generated on the software side (allowed characters: A-Za-z0-9_-). - Provider (
provider) — Specifies the name of the integration provider for this user. - Password (
password) — Password for logging in without integration with the software. The password must meet the following rules:- The maximum depth of the old password history for checking used passwords is 5 (history) + 1 (current);
- Allows a maximum of 5 failed login attempts;
- Lock account for 5 minutes after maximum login attempts;
- Allows a minimum of 12 characters, including at least one uppercase, one lowercase, and one number.
- Role (
role) — The user's role in the proctoring system. It can take the following values: Student, Proctor, Administrator. - Nickname (
nickname) — The name of the user displayed in the proctoring system interfaces. - Group (
group) — An arbitrary identifier of the user's group, which indicates that the user belongs to a specific group. This allows connecting multiple proctors to the same group and adding this group to session participants. In this way, all proctors with this group, both old and newly created, will automatically become participants in sessions with this group. - Language (
lang) — The language of the user interface; by default, the browser's language is used. - Labels (
labels) — A comma-separated list of labels that can be used for searching. - Locked (
locked) — The blocked user will not be able to log in to the proctoring system. - Identity verification (
verified) — The flag comparing the photo from the camera and the photo on the identity document within the user profile.
5.3. Two-factor Authentication (2FA)
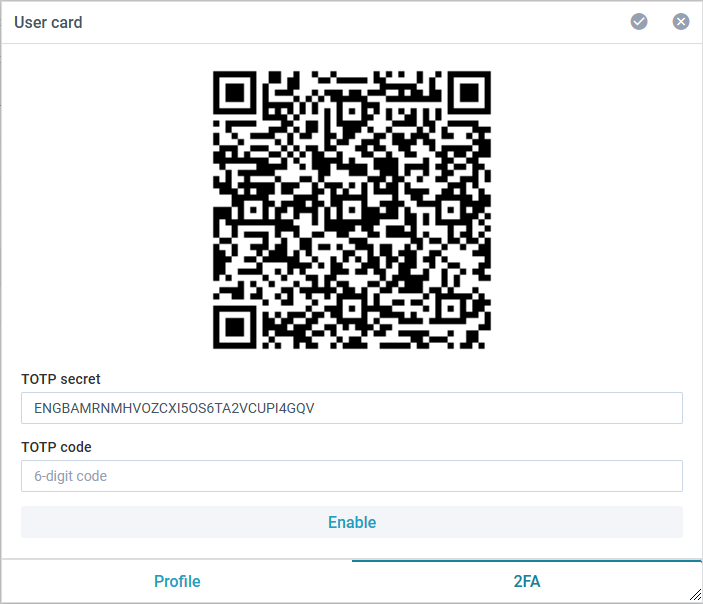
To enhance overall system security, the two-factor authentication (2FA) can be enabled for user accounts with roles administrator or manager. To do this:
-
Go to the 2FA tab in the user card
-
Scan the QR code using a mobile authenticator app (e.g., Google Authenticator or Authy), and enter the code from the app into the TOTP code field
- Alternatively, instead of scanning the QR code, it's possible to manually enter the TOTP secret value into the authenticator app
- Save the user card by clicking on the check icon
The 2FA can be disabled by using the same tab. The disabling will require entering a code from the authenticator app to confirm the action.
5.4. Photo of the face and the ID
The administrator can view a photo of the user's face and the ID, or add/delete them. When you upload photos, the face is recognized on them, so you can only upload photos where there is only one face and it can be recognized.
5.5. User rating
Once the sessions are passed, test-taker profiles are rated if their sessions have been issued a conclusion. The rating can be used to rank test-takers according to the results of proctoring sessions they have completed. The rating is calculated using the following formula:
$$R=\frac{(R_0+C)}{2}$$
where $$R\in[0,100]$$ — new rating, $$R_0$$ — previous rating (the first is $$R_0=C$$), C — proctor's conclusion (100 — Positive, 0 — Negative).
6. Draft chat messages
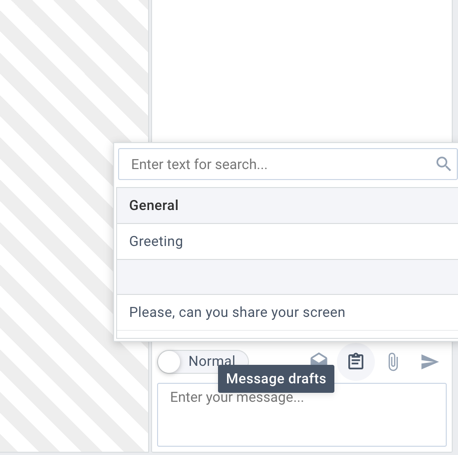
In the Drafts interface, an administrator can create a list of predefined messages to communicate with participants. This list will be visible to all proctors in the chat interface. Using this list, proctors can respond more quickly to typical questions or send regular information to participants. Messages are bound to a template and can be grouped by a specified key. If no template is specified, such messages will be linked to sessions without a template.
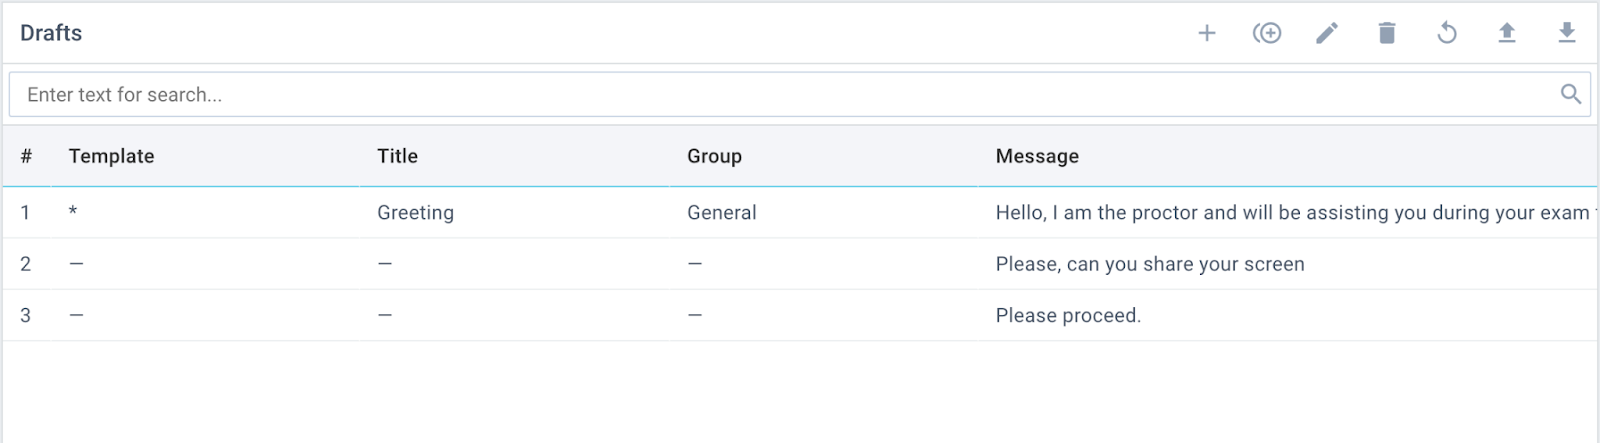
You can add a new draft message or edit an existing draft message.
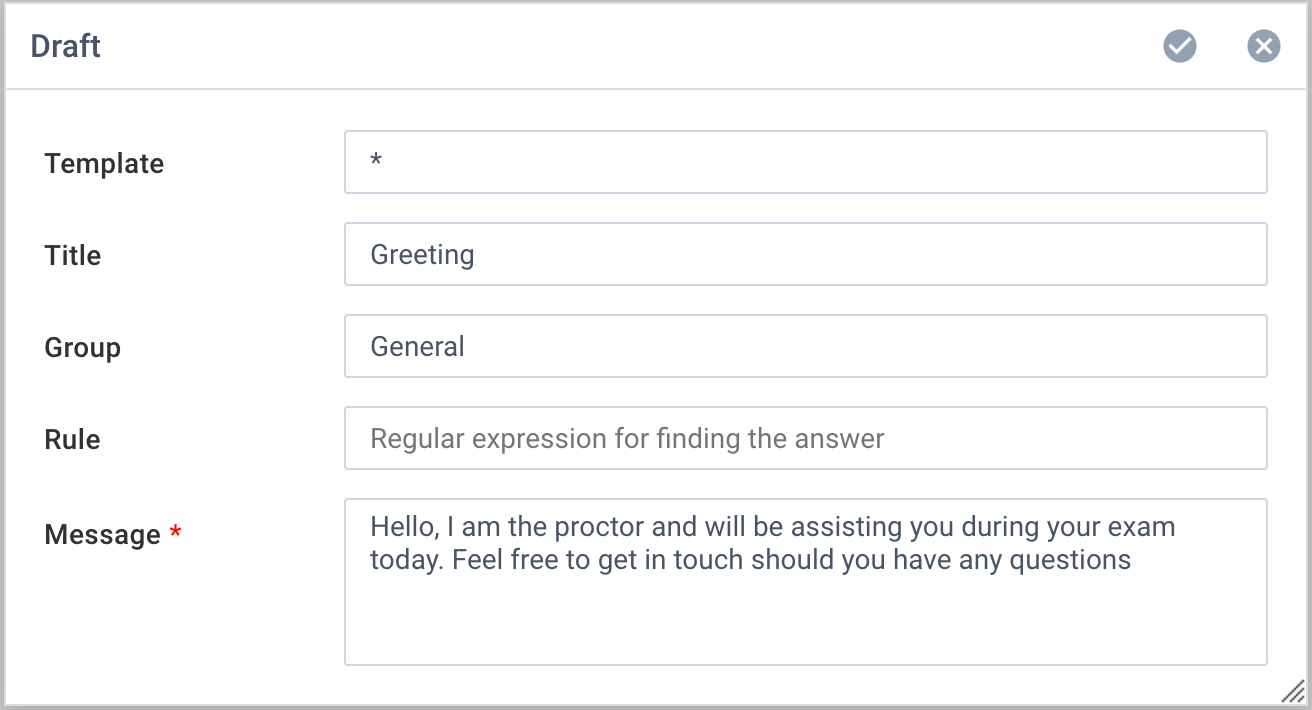
Each draft has the following parameters:
- Template — Specifies for sessions which template should be used to display this draft. The field can have several values:
- Blank — Only displayed in sessions that do not have a template;
*(asterisk) — Displays in all sessions;- Session template identifier — Only displays in sessions that have been created based on the specified session template.
- Title — The abbreviated name of the draft for display in the proctor interface. If the field is empty, the full text of the message will be displayed.
- Group — The name by which to group drafts in the proctor's interface. This visually divides the drafts into groups for the proctor to work with.
- Message — Message which will be inserted into the proctor's chat when you select this draft from the list.
- Rule — An auto-response rule, a regular expression (basic POSIX syntax) which is applied to all incoming messages from a test-taker. If there is a match for this regular expression in the message from the test-taker, the system will automatically reply with the message from this draft. The "Group" field will be used as the sender name of the message.
In the proctor interface, the draft message list can be accessed via the button next to the chat text entry field.
7. File manager
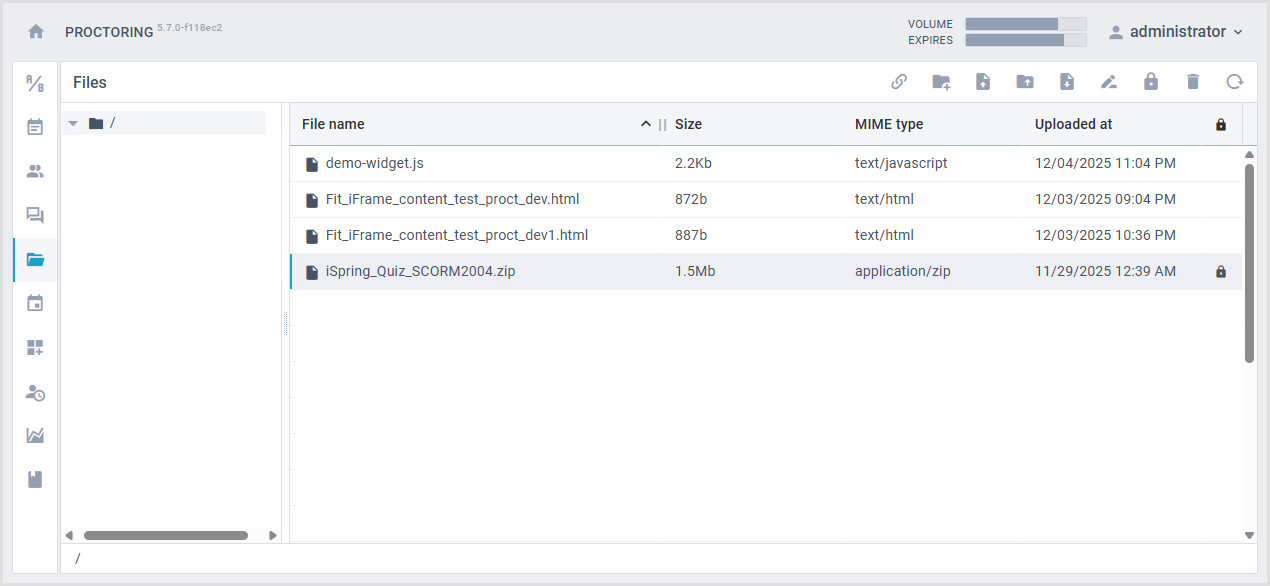
In the "Files" interface, the administrator can upload static files of arbitrary types, which will be available without authorization via a unique link.
This functionality can be used to publish SCORM packages in ZIP format. You can also upload pages with rules there that need to be displayed at the first stage before the start of each session to participants.
Uploaded files are available without authorization via unique links in the format /api/files/:path, where :path is the relative path to the file in the file manager.
8. Proctors schedule planner
In the "Scheduler" interface, the administrator can view, add and delete time slots for a specific proctor in 15-minute increments.
If the schedule is filled, test-takers will be able to select slots designated by the proctor on the calendar, and the proctor will become an observer for those sessions.
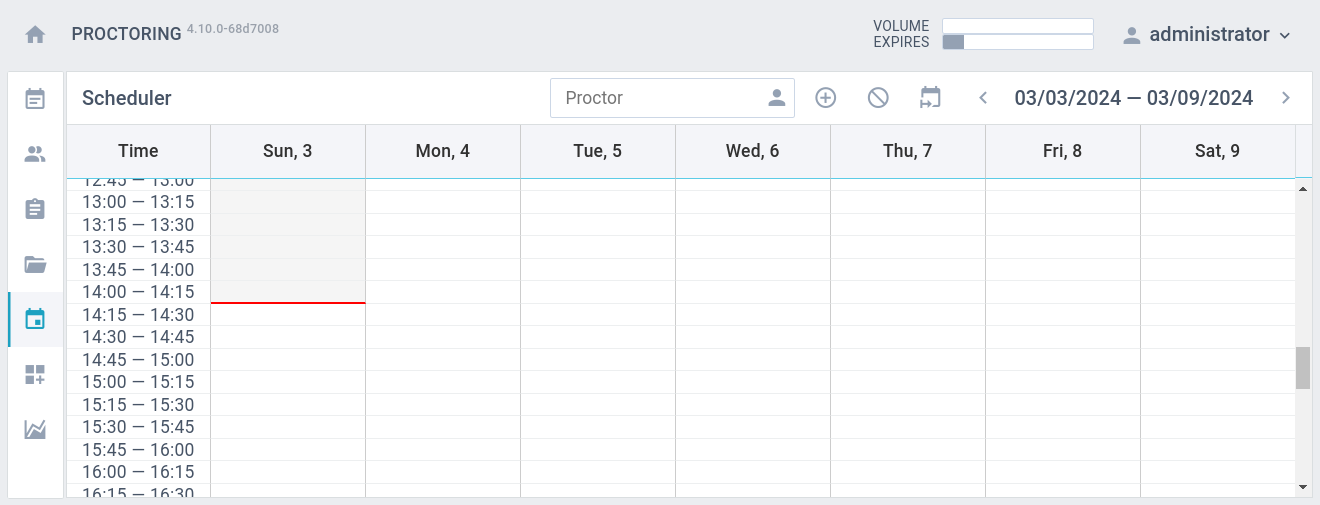
The scheduler interface is presented in the form of a weekly calendar, where you can select an arbitrary number of time slots on any future day.
9. Monitoring and viewing session reports
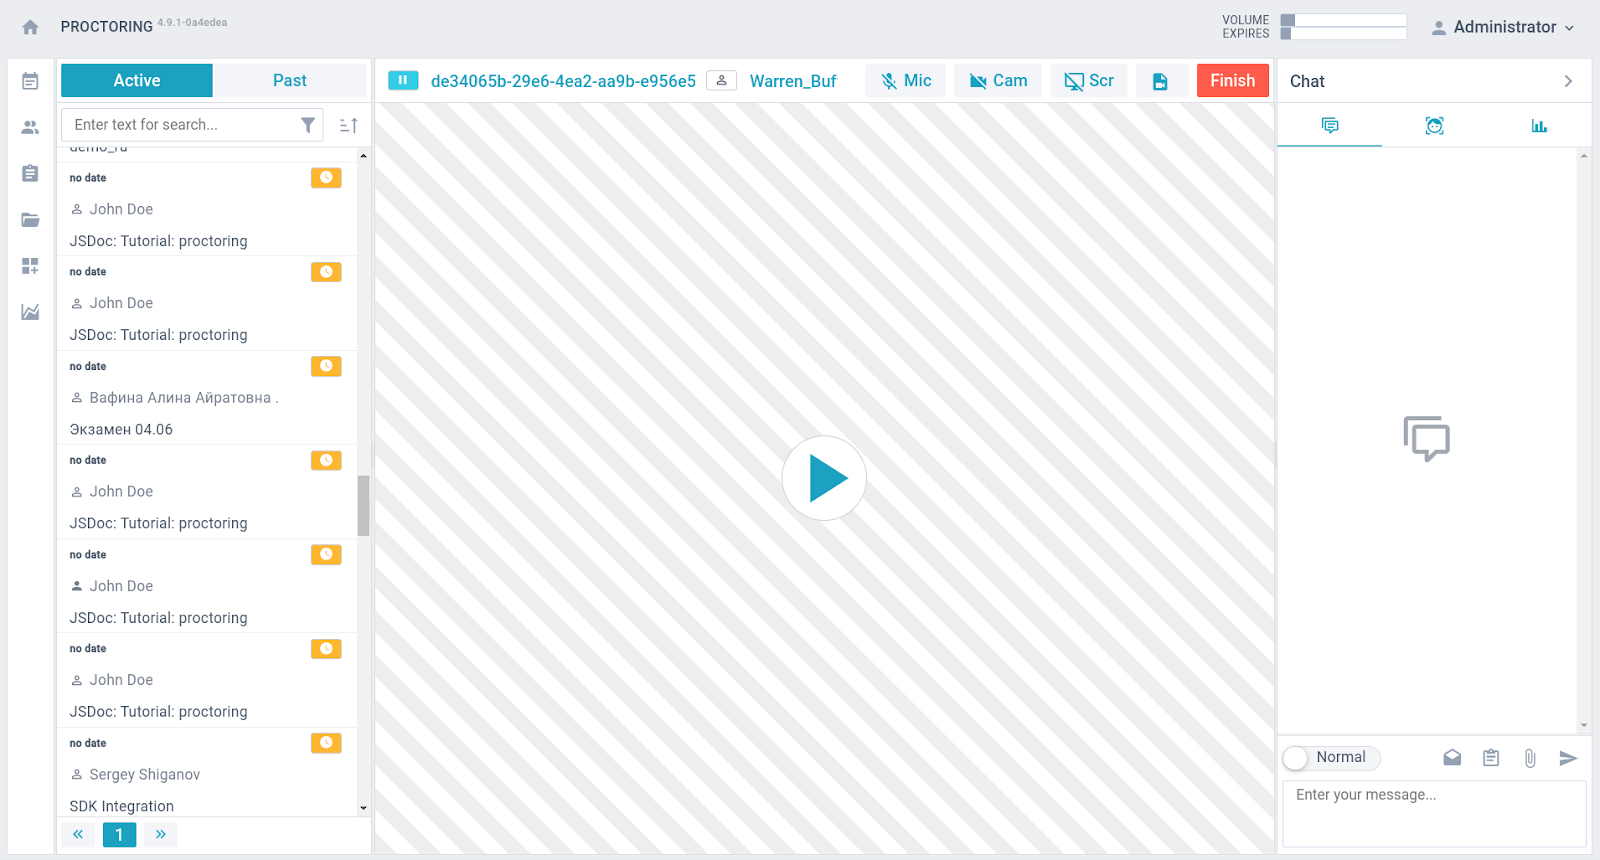
In the "Supervision" interface, the administrator can connect to any of the ongoing sessions, carry out selective group monitoring and view the reports of past sessions.
NOTE: To keep monitoring orderly and transparent, the admin will only receive events from the sessions they have selected in the left-hand column. You choose the sessions you wish to focus on, and once you are finished reviewing them, you select the next set of sessions.
10. Proctor Time Reports
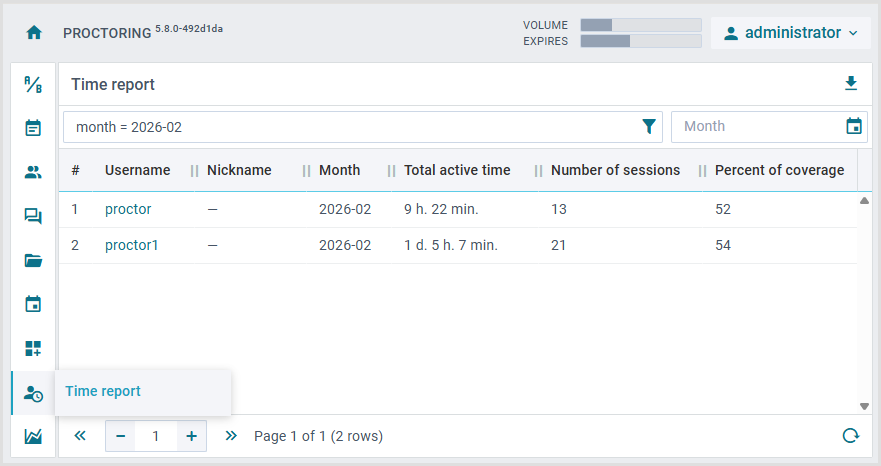
The "Time report" tab shows how much time proctors spent on actual observation of sessions over a period of 1 month. You can select the period both in the filter at the top and in the calendar at the top right. The "Percent of coverage" column shows how much time, on average, this proctor observed each session relative to the duration of the session itself. For example, if all sessions were 1 hour long, and they observed each one for 6 minutes, the Percent of coverage = 10%.
11. Usage statistics
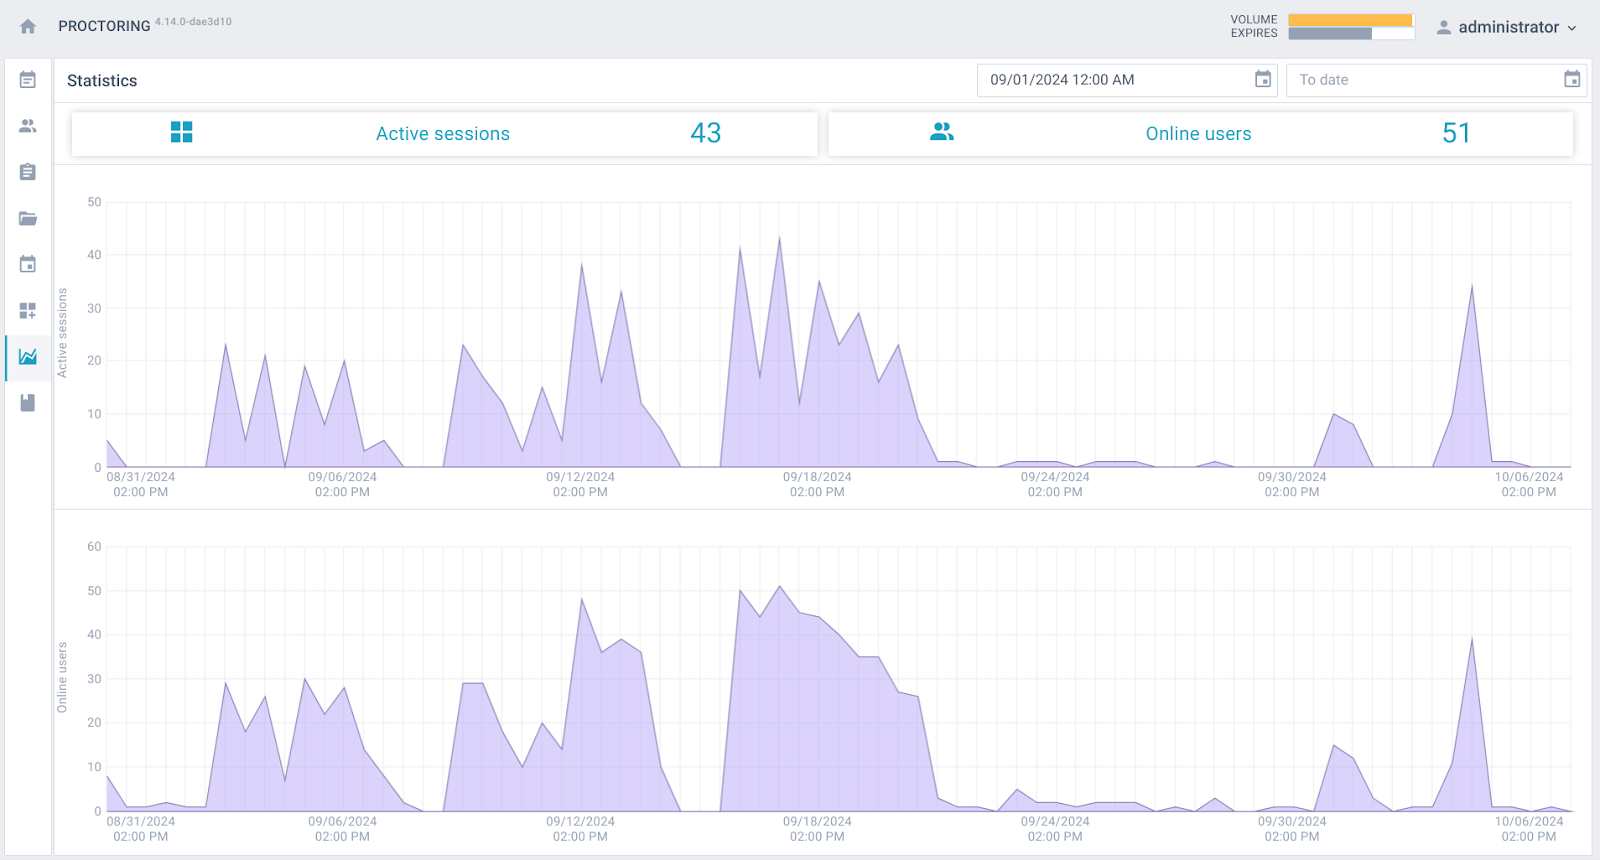
The "Statistics" interface displays the average number of active sessions and online users. You can specify the range of dates and times for the statistics you want to view. The top part of the interface displays the maximum values of the indicators that were recorded for the specified period of time, e.g. Active Sessions, Online Users, CPU and RAM workload. If no date is set, the interface will display data for the last hour, and the graphs will be updated every minute.
You can set a date and time period in order to capture the statistics for a certain period. The time interval is calculated from the current time (input field "End date"), and the interval corresponds to one minute. If you do not change the end date, then every minute there will be a request for data from the server. If the date is set, then the schedules will not be updated. To view data for a longer period, you can increase the interval.
12. Journal
The Journal interface displays the log of changes in the proctoring system data. This function is designed to provide transparency and control over user actions in the system.
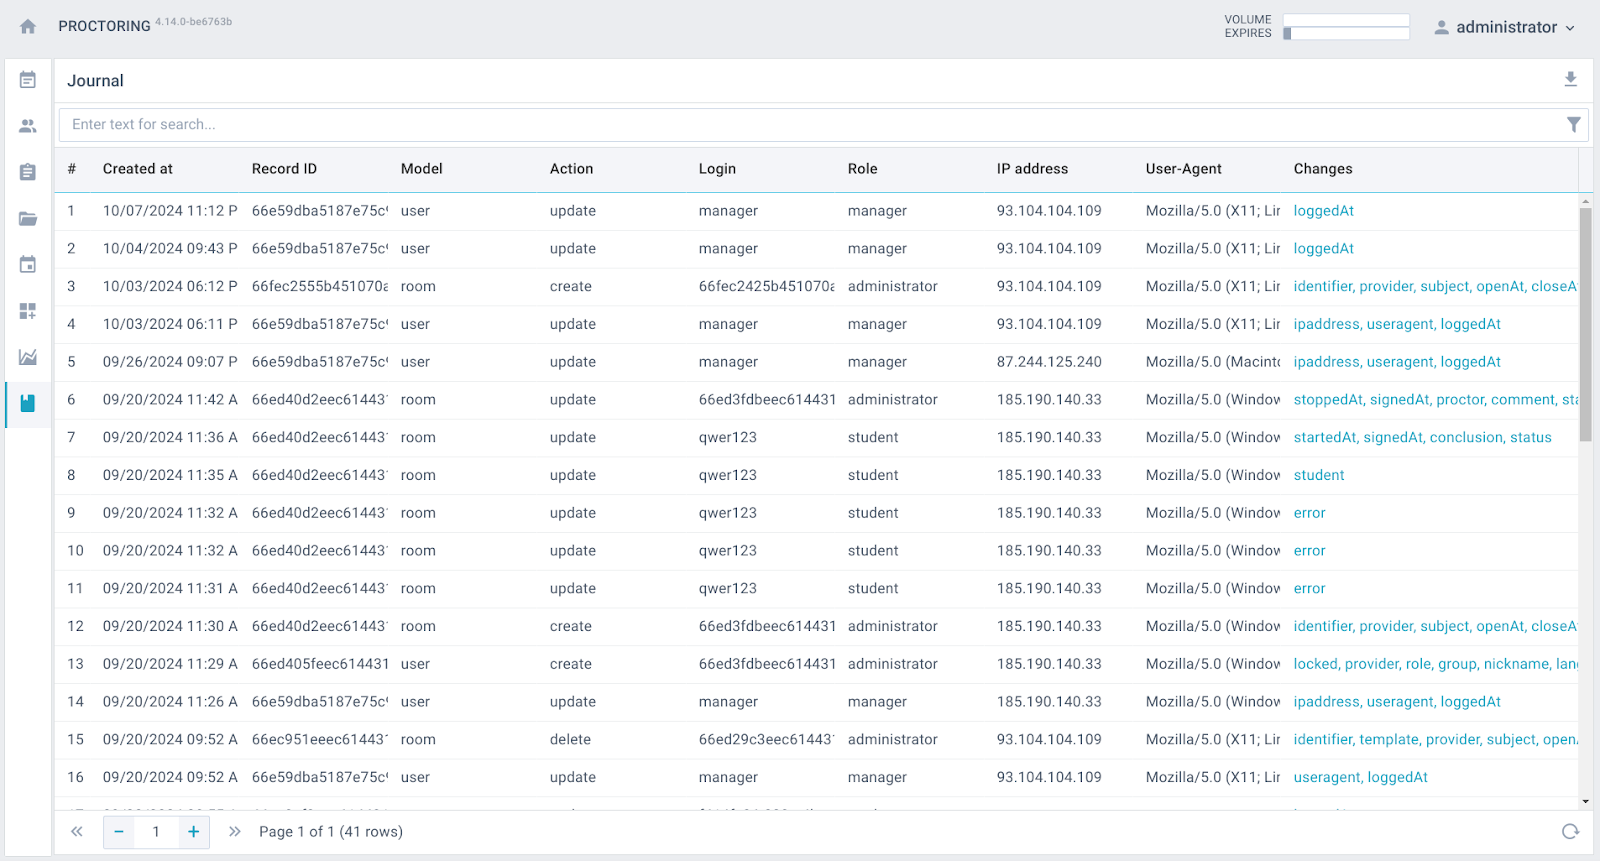
Changes in the "config", "user", "room", "draft" models are saved in the log. If the change is related to a specific user (for example, changed session parameters or logged into the system), then the "actor" of this change is indicated. If the change is not directly related to the user, then "actor" is not specified (for example, when the session status changes).
For example, you can find all changes for a specific session or user by copying their Internal ID from the Sessions tab or Users tab accordingly. Then, paste it into the filter editor on the Journal tab and select the "Record ID (record)" field.
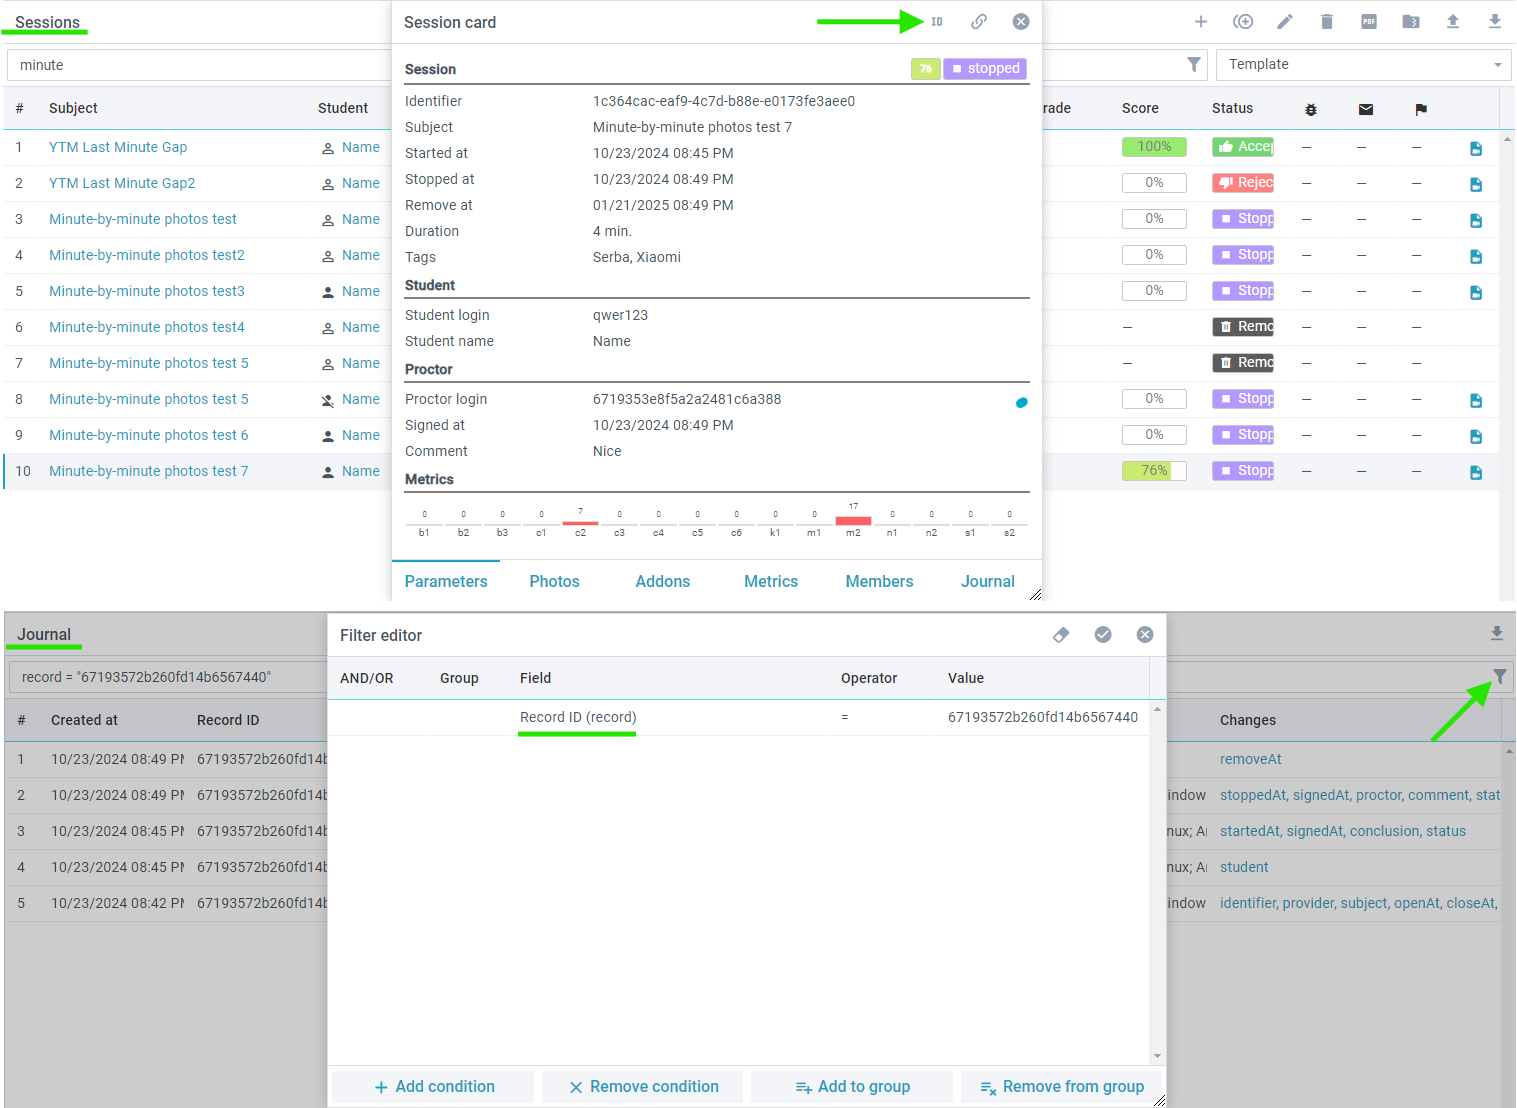
If you specifically need to find all the changes made by a user, you can use the "User ID (actor.id)" field.
In the dropdown list of fields in the filter editor on the Journal tab, you can choose from numerous parameters to filter the data according to your needs.
The log can be exported to CSV. And using the filter, you can select only the changes of interest from all.
13. Typical use cases
13.1. Extend session time
If for some reason a proctoring session was accidentally terminated by a test-taker or proctor, it might be necessary to extend the session. To do this, it is enough to find it, proceed to editing, and change the openAt field so that the date and time in it exceed the current one. After that, you need to save the changes; the session status will change to "started", and the test-taker will be able to reconnect.
13.2. Uniform distribution of sessions among proctors
This can be done through an "Assessment" or by distributing invite parameters through the integration.
To equally assign proctors from a predefined list to each new session, you need to go to the corresponding "Assessment" and go to the "Invitations" tab. You can add proctor logins to the list one by one or enter several at once, separating them with commas. Make sure that proctors with the listed logins have already been pre-registered in the system; otherwise, during the distribution, test-takers will be assigned to a non-existent proctor.
Next, you need to configure the parameters of the equal distribution. Quorum is a parameter that determines how many proctors will be assigned to one test-taker (session). For example, if the quorum is 1, only one proctor will be bound to each session, and if 2, no more than two proctors are allocated to one session. Concurrent is a parameter that limits the number of sessions per proctor. When using this parameter, there is a risk that some test-takers will be left without a proctor if the total number of concurrent sessions exceeds the number of proctors multiplied by the concurrent session limit.
13.3. Technical check after the start of a session
The beginning of a session means a successful start of testing. Rechecking the hardware after returning to the previously left session would take extra time, so it is not conducted.
However, in this case, there is a risk that the participant returns to testing using equipment that is not supported by the proctoring system. To track this behavior, the system provides the "b1" metric — Browser is not supported.
13.4. Link to protocol without authorization
You can create special links to access a specific session protocol. By these links, you can open the session protocol without logging in. To allow opening sessions using a link without authorization, you need to enable the "Make available by link (shared)" add-on for a specific session or in the Assessment. In this case, it is recommended to use complex random session IDs, which are protected from attacks. The link to the protocol is formed as follows:
https://demo.proctoring.app/api/report/<identifier>
where demo.proctoring.app is the address of the proctoring system server, and <identifier> is the session identifier.
13.5. Uploading of users and sessions from a CSV
When the system is used without integration via IFRAME, it can be convenient to upload sessions and users in one package from a CSV file. To do this, you need to use the import function.
The minimum set of columns in a CSV table is recommended as follows (in brackets are names of the fields that should be inserted as the first line in the file as a header):
- Sessions:
- Identifier (
identifier); - Title (
subject); - Source (
url); - Test-taker's login (
student.username).
- Identifier (
- Users:
- Test-taker's login (
username); - Password (
password); - Test-taker's name (
nickname).
- Test-taker's login (
The CSV file must be saved in Unicode (UTF-8) encoding, with a "," separator (comma).
Next, this file must be imported in the "Users" and "Sessions" sections.
The above-mentioned steps result in a template file for filling in users and sessions. Now you need to fill in the information on users and sessions.
If sessions with an identifier or users with username already exist in the system, then to update such sessions, you need to add a field — the internal identifier id.
13.6. Opening of CSV reports in Excel
Microsoft Excel can read a UTF-8 encoded CSV file in a few simple steps:
- Open Microsoft Excel → Click the "Data" tab → click the "From Text" button → a dialog box opens.
- In the dialog box select the CSV file → a window opens.
- In the window select the Unicode encoding (UTF-8) and the column separator "
," — comma.
13.7. Exporting CSV reports from proctoring
In order to export sessions, if it is necessary:
- Click the "filter" button.
- Click the "add filter" button.
- Select the field you want to search for.
- Specify the operator and the value of the field.
- Click the "save" button.
- Click "Export CSV".
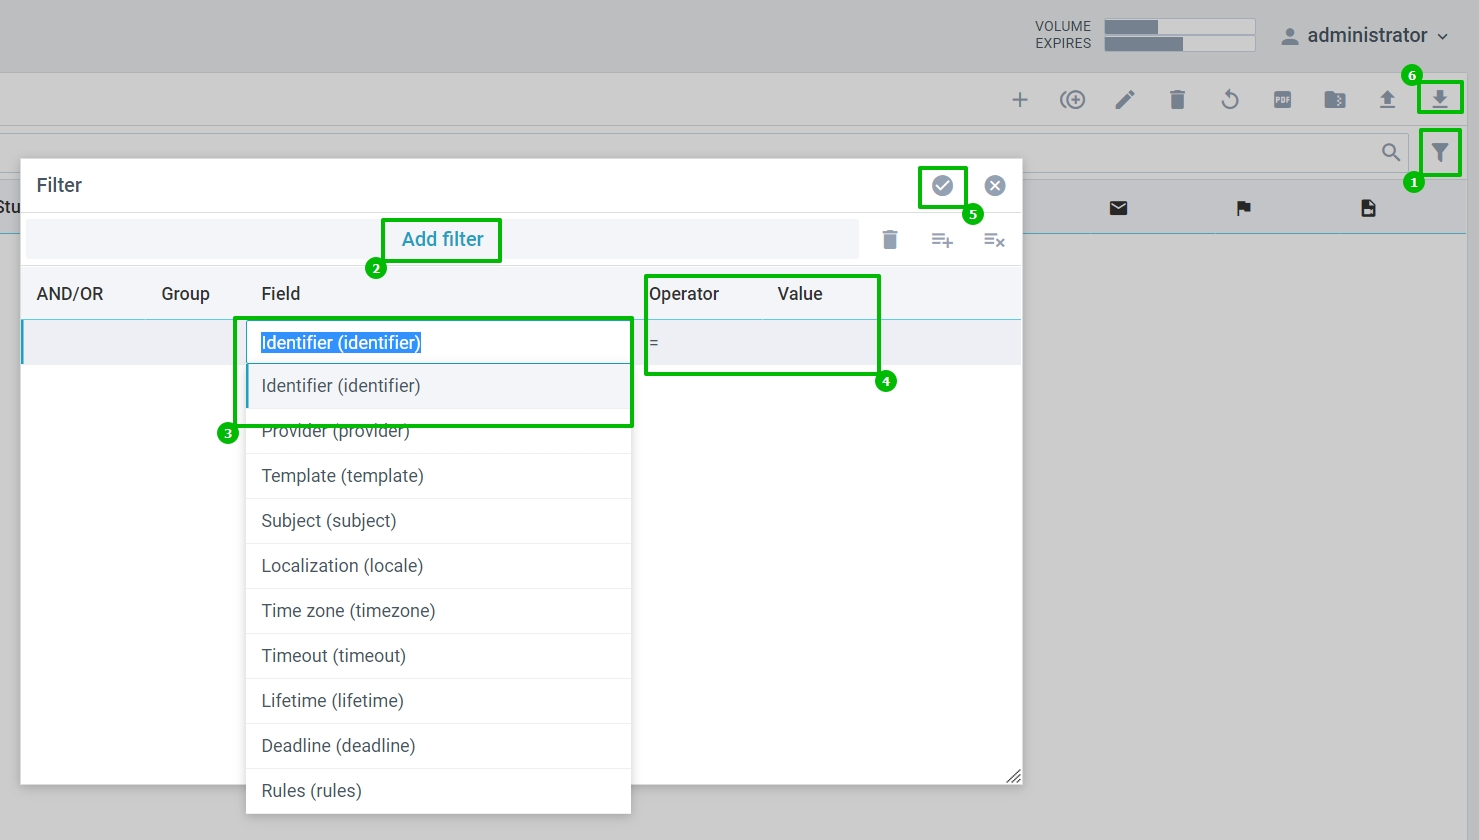
All sessions can be exported by clicking the "Export CSV" button without entering any filters.