SCORM Player Guide
This guide shows how to play custom SCORM packages as-is inside OctoProctor. To inject proctoring into a SCORM package and run it in your own LMS, see the SCORM LMS Integration Guide.
This guide provides a step-by-step walkthrough for integrating and configuring your SCORM packages within the OctoProctor proctoring system. Say goodbye to complex integrations or LMS limitations. You can seamlessly display your SCORM content directly within the proctoring.
Simply create your SCORM package (any supported version) using your preferred editor. Upload it to OctoProctor and lock it to ensure the test taker cannot open it without the proctoring session.
Voilà! Upon completion, the OctoProctor dashboard will immediately display the test taker's grade and final passing status, in addition to all standard proctoring data.
1. Create Your SCORM Package
While you may choose any authoring tool, all SCORM packages adhere to the same industry standards. For clarity, we will demonstrate the process using two industry-leading tools: Articulate 360 and iSpring QuizMaker. You can apply these configuration principles to any other SCORM authoring tool.
2. Configure and Export Quiz Content
2.1. Configuration using Articulate 360
Articulate 360 is a powerful and user-friendly tool for creating high-quality SCORM packages.
- Log in to your Articulate account: https://www.articulate.com/
- Create a new course from a template or select an existing one under the Rise 360 tab.
- When editing your quiz, set the required "Passing Score" by clicking the gear icon. If the test taker's score meets or exceeds the "Passing Score" the quiz is flagged as passed. This status is immediately transmitted to OctoProctor as the
passedparameter, displayed as a green checkmark (or true/false in bulk exports). -
Export the completed assessment to a supported SCORM version (1.2, 2004 2nd, 3rd, or 4th edition).
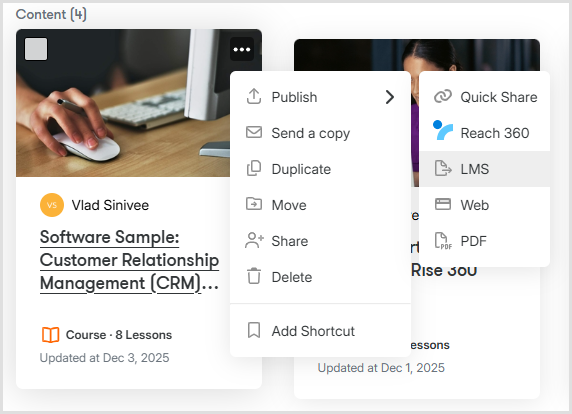
To export: Navigate to your course in Rise 360 -> 'Private', click the three dots, and select Publish -> LMS.
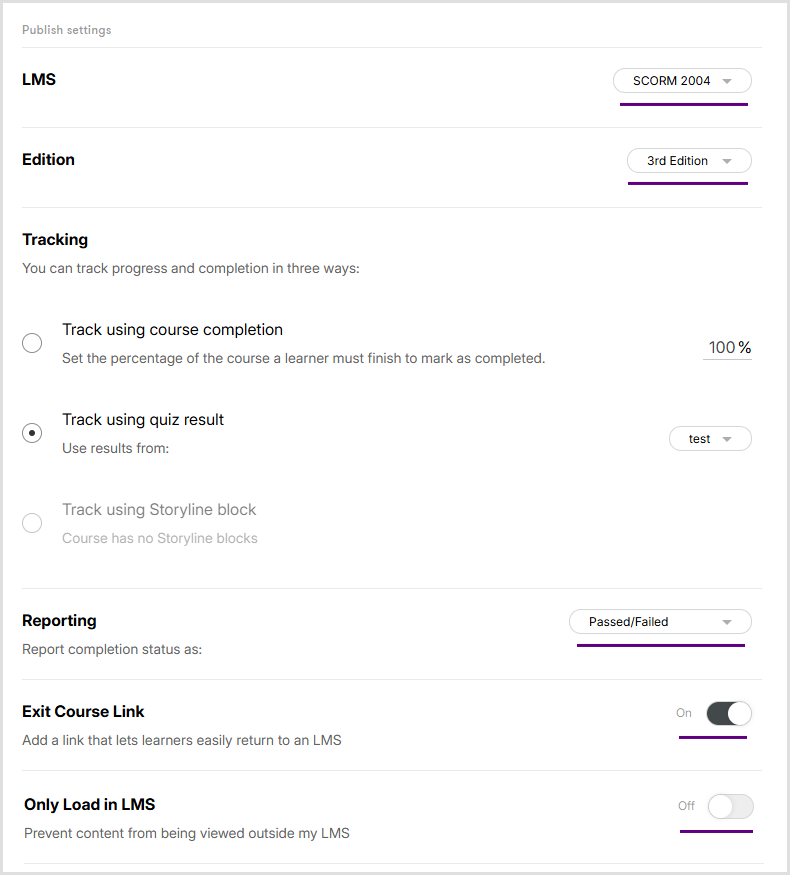
In the publishing window, configure the following:
Export
| Field | Configuration | Notes |
|---|---|---|
| LMS | Select SCORM 1.2 or SCORM 2004. | This choice does not impact the core functionality within OctoProctor. |
| Edition | Select the required edition (for SCORM 2004). | This choice does not impact the core functionality within OctoProctor. |
Tracking
| Option | Rationale | Recommendation |
|---|---|---|
| Track using course completion | Use this when tracking content consumption (e.g., safety training, where viewing all slides is mandatory) over a test score. | Used for non-graded content. |
| Track using quiz result | Use this when the primary goal is to verify mastery of the material through a graded quiz. | Recommended for Assessments. The final result (Passed/Failed) is automatically determined by comparing the test taker's score against the pre-set 'Passing Score'. |
Reporting Options
| Option | Recommendation |
|---|---|
| Reporting - Passed/Failed | RECOMMENDED for Quizzes. This sends the most accurate pass/fail status to OctoProctor. |
| Reporting - Passed/Incomplete or Complete/Incomplete | Only these options are available for "Track using course completion." NOTE: The test taker must manually end the proctoring session upon assessment completion. |
Exit Course Link - On: This provides the test taker with a convenient button that simultaneously ends both the assessment and the proctoring session.
Only Load in LMS - OFF: Since OctoProctor can lock SCORM packages so that they open only inside a proctoring session, this additional layer of protection is not required for successful deployment.
- Click the 'Publish' button to receive the SCORM package ready for upload.
2.2. Configuration using iSpring QuizMaker
iSpring QuizMaker is one of the most popular SCORM editors with flexible settings.
- Open the iSpring QuizMaker application: https://www.ispringsolutions.com/ispring-quizmaker
- Create a new assessment or open an existing one.
-
When editing, set the "Passing Score". This is done by clicking the 'properties' gear icon in the 'Home' panel and selecting 'Quiz Scoring'.
If the test taker's score meets or exceeds the "Passing Score," the quiz is flagged as passed, and the
passedparameter is sent to OctoProctor.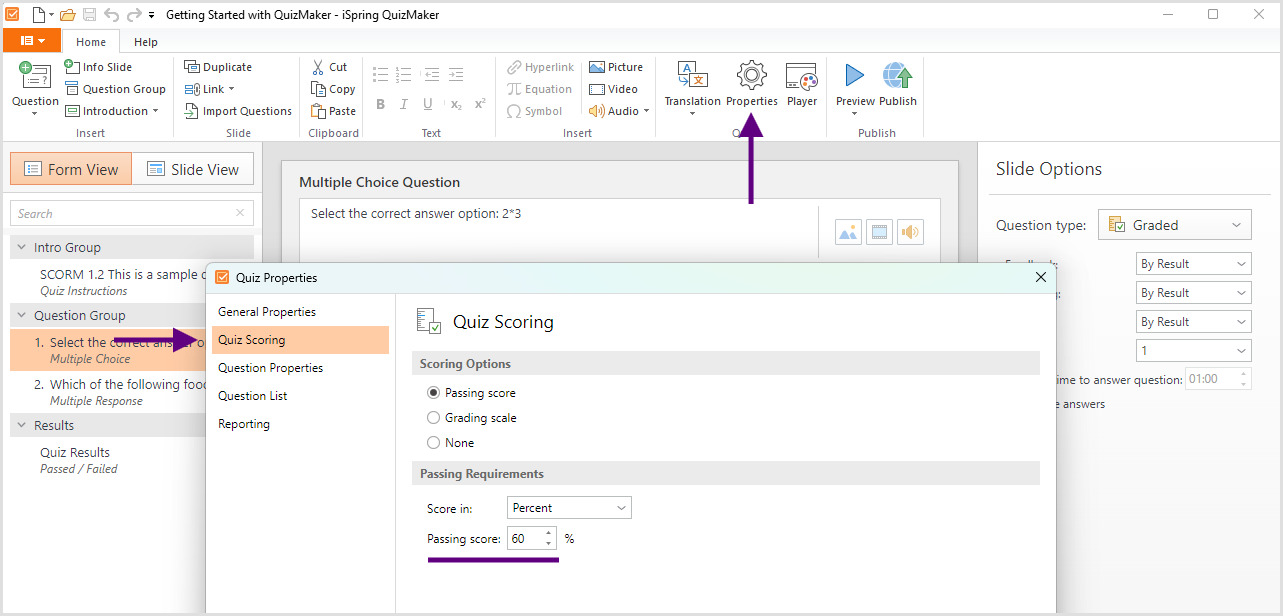
-
Export the completed assessment to a supported SCORM version (1.2, 2004 2nd, 3rd, or 4th edition).
To export: Click the 'Publish' button in the top menu 'Home' -> 'LMS'.
When selecting SCORM 1.2: The field 'Report status to LMS as' is available. We recommend selecting Passed/Failed. This ensures SCORM sends two clear signals: Completion (Complete) and Success (Passed/Failed).
-
Click the 'Publish' button and receive the SCORM package ready for upload.
3. Upload the SCORM Package to OctoProctor
This step describes uploading of the created SCORM package (as a ZIP archive) directly to OctoProctor. This ensures the proctoring service can open the content from its domain within our system.
3.1. Log in to the proctoring system as an administrator
Your OctoProctor manager will provide you with login information (server URL and admin credentials). Paste the URL into your browser and enter your admin credentials.
3.2. Upload and Secure the Content
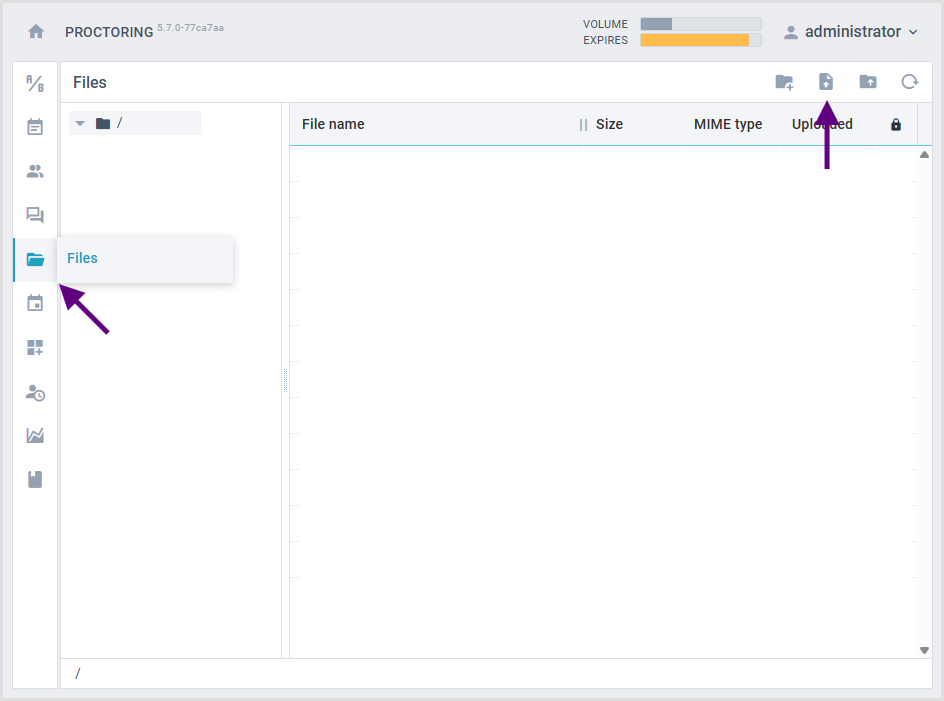
- Navigate to the 'Files' section.
-
Click the 'Upload files' button to select your SCORM package (in .zip format), or 'Upload folder' to select a folder containing multiple packages.
-
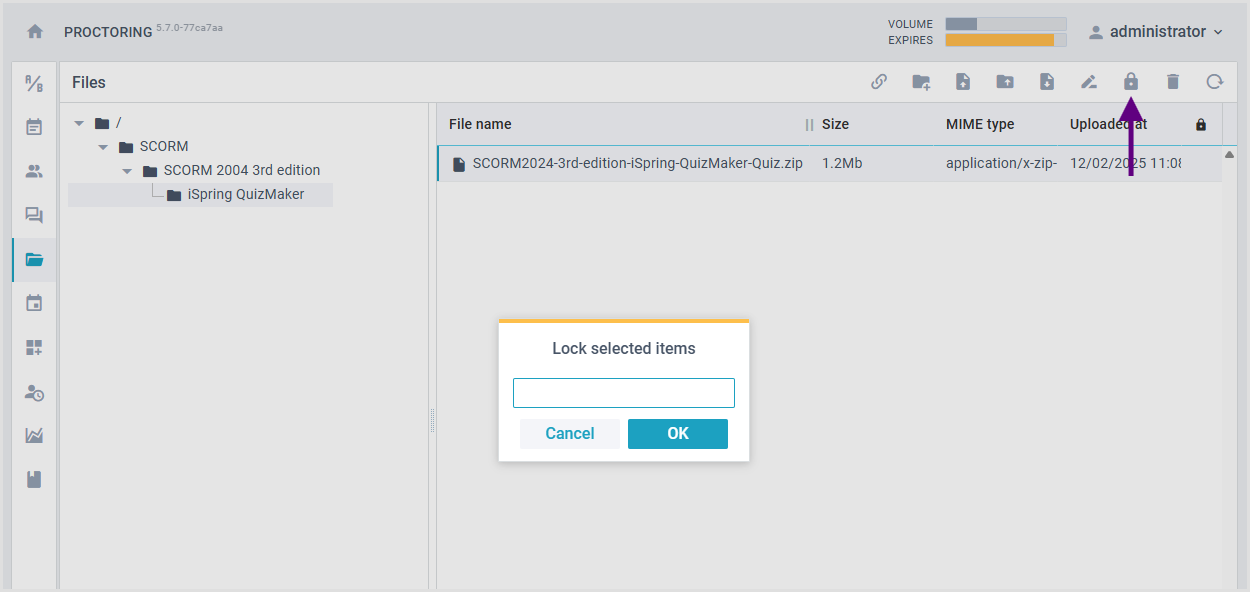
Secure your content: To further protect your content, lock the uploaded SCORM package. Select the file in the 'Files' interface and click the 'Lock selected items' button.
NOTE: No password is needed. A locked file can be opened only by an administrator and by a test-taker whose session has the link to this file in the 'Content URL' field of the assessment (see Section 4). Click the button again ('Unlock selected items') to remove the lock.
-
Select the file and copy the link to it by clicking the 'Copy the link to the selected file' button.
NOTE: This link is required when configuring the assessment.

4. Create a New Assessment
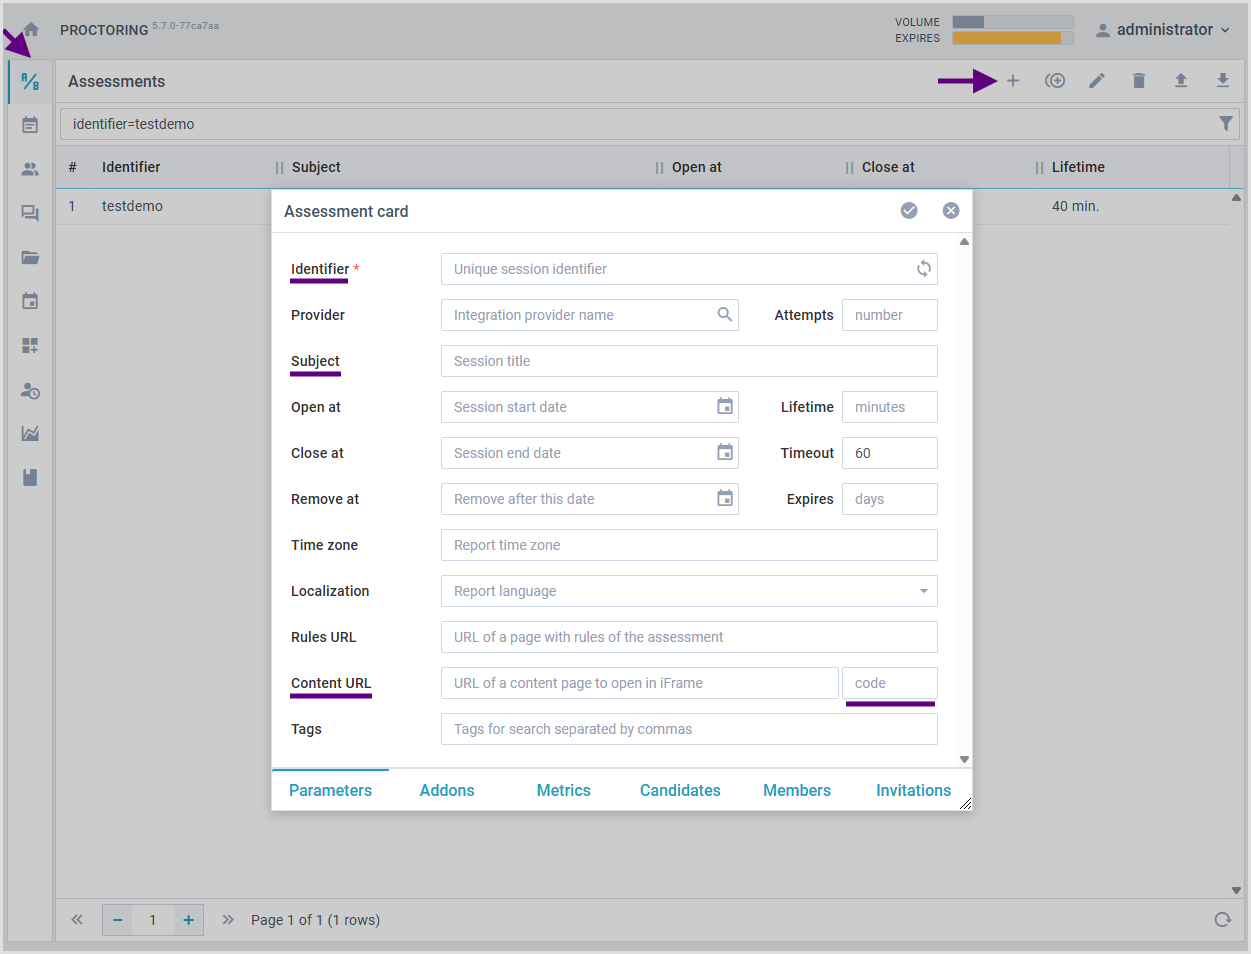
In the Assessments tab, create a new assessment by clicking on the plus sign in the upper right corner.
| Field name | Description | Example |
|---|---|---|
| Identifier | The unique assessment ID students will enter upon login. Make it descriptive and easy to remember. (allowed characters: A-Za-z0-9_-) | MathExamJan2026 |
| Subject | The full title of the assessment. This helps you filter sessions and provides a full description of the event. | Final Exam: Mathematics for Engineers, January 2026 |
| Content URL | The link to the SCORM package copied from Section 3.2, step 4. | https://demo.proctoring.app/api/files/OctoQuiz-SCORM2004.zip |
NOTE: The assessment with basic parameters satisfies most needs. However, if you require more flexible customization (e.g., Session management), please consult our public Administrator's Guide
IMPORTANT: In the Add-ons tab, please make sure to select the Use quiz player (
quiz) add-on from the Add-ons tab so the file can be correctly embedded.
5. Create a list of candidates
The 'Candidates' tab in the assessment properties allows you to control who can participate in the event.
- If the list is empty: Anyone can enter.
- If at least 1 entry exists: Only the listed test takers can participate.
If your event requires a finite list of test takers who do not yet have an account, follow these steps:
-
Create a list of unique usernames (e.g., phone numbers are recommended for uniqueness). Separate them with a comma and a space. Example:
personA,personB,personC.NOTE: Allowed characters: A-Z, a-z, 0-9,
_,-. -
Open the created 'Assessment' for editing (double-click on empty part of the line or use the pencil icon).
-
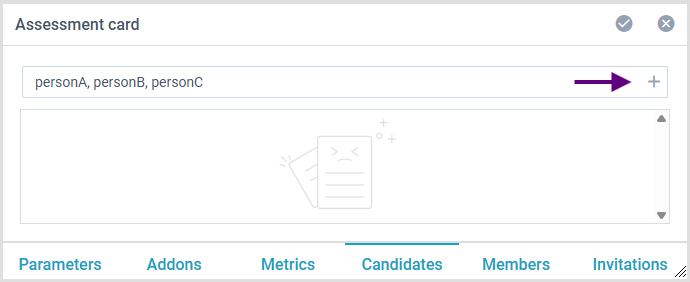
Paste the list of usernames into the 'Enter candidate name...' field and click the plus sign on the right.
-
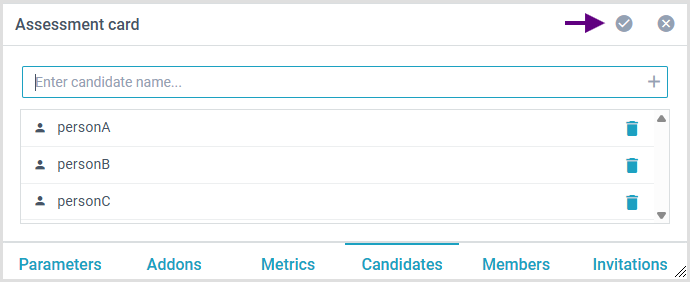
The usernames are added. Click "save".
6. Share credentials with the test takers
Test takers need to receive the following essential data:
- URL: Link to your proctoring server (e.g.,
https://demo.proctoring.app) - Assessment Identifier: The unique assessment name created in Section 4.
- Username: The unique name of the test taker created in Section 5.
Example email:
Dear candidate,
To take the proctored economics exam, please enter
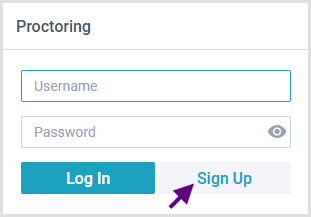
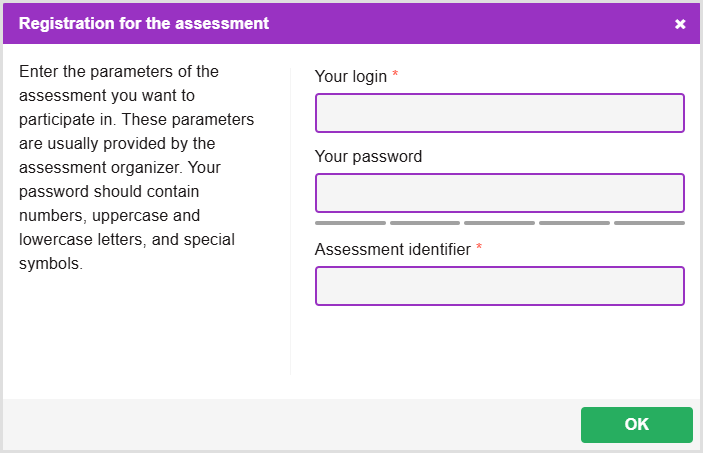
https://demo.proctoring.appinto your browser's address bar. Select 'Sign Up' and enter the following information:Your login:
personAAssessment identifier:
economyFall2026stage1
7. Analysis of the results obtained
When the test taker completes a session, the proctoring administrator can access all standard session metrics (video, logs, events) plus two dedicated SCORM parameters received from the course package itself. These SCORM-specific results are visible in the Sessions tab, in the Passed and Grade columns:
- ☑ or ☒: This is the
passedparameter. It indicates whether the test taker met the required "Passing Score" (discussed in Section 2). If the quiz score meets or exceeds the "Passing Score," the result is ☑; otherwise, it is ☒. - Grade (0% to 100%): This is the score the test taker achieved based on the content in SCORM. (e.g., if there were two questions, each worth 50 points, and only one was answered correctly, this field displays 50%).
Do not confuse the Grade with the Credibility score column: the credibility score is the result of the proctoring itself (violations of the rules during the session), and it does not depend on the answers.
This data is also available in the Session card, the .csv export, and within the filter in the Sessions view for bulk analysis. (Please consult the public Administrator's Guide for more details on export and filtering.)